The keywords in this question are distribute and streaming. Digital distribution is the delivery of your music to digital service providers like Spotify, Apple Music, Amazon Music, TIDAL, Napster, Google Play, Deezer, among many other streaming platforms.
Digital distribution companies (CD Baby, DistroKid, RouteNote, Mondotunes, ReverbNation, Landr, Awal, Fresh Tunes, Tunecore, Chorus Music, Symphonic, etc.) help get your music onto these digital service platforms. Without a digital distributor, the doors to these outlets are pretty much closed. That said, distribution companies do NOT own your music. They may take revenue from royalties, but you retain your rights. Distribution companies are also NOT stand-alone stores (i.e. BandCamp) although some offer this service (e.g., CD Baby).
This document is a walk-through going over the steps to digital distribution, from start to release. Over the course of the walk-through, we will create a track and then release that same track on a digital distribution service (all free). The goals of the walk-through are to:
- Understand the basics of digital distribution
- Take some of the fear out of releasing your music online
- Prepare for future self-release work
The walk-through should take about an hour, depending on your familiarity with audio software and a relaxed mind when it comes to generating names/titles.
The various components of releasing music in this walk-through consist of
- Create a track for release (we will create a pink noise track)
- Generate all materials associated with the release
- Register with a digital distribution service (free)
- Distribute your work with the digital distribution service
- Following any additional steps you can take (PRO registration, SoundExchange, claim artist profile, digital store setup)
Since the hardest part of the release process is the music creation (right?), let’s just get over this hurdle by creating a noise track right now in the next five minutes. Don’t worry, we will create a pink noise track (for relaxation and sleep) to help us skirt around personal aesthetics, notions of perfectionism, genre, and all things that take time and intentional decision-making. If you have a music track already, just skip this next section.
1. CREATE A PINK NOISE TRACK FOR RELEASE
If you have a track for the release that you want to use INSTEAD of pink noise track(s), please skip this step. If not, read on. Open up Audacity (link) or any free software that can “generate” noise. Audacity is free and contains a noise generator.
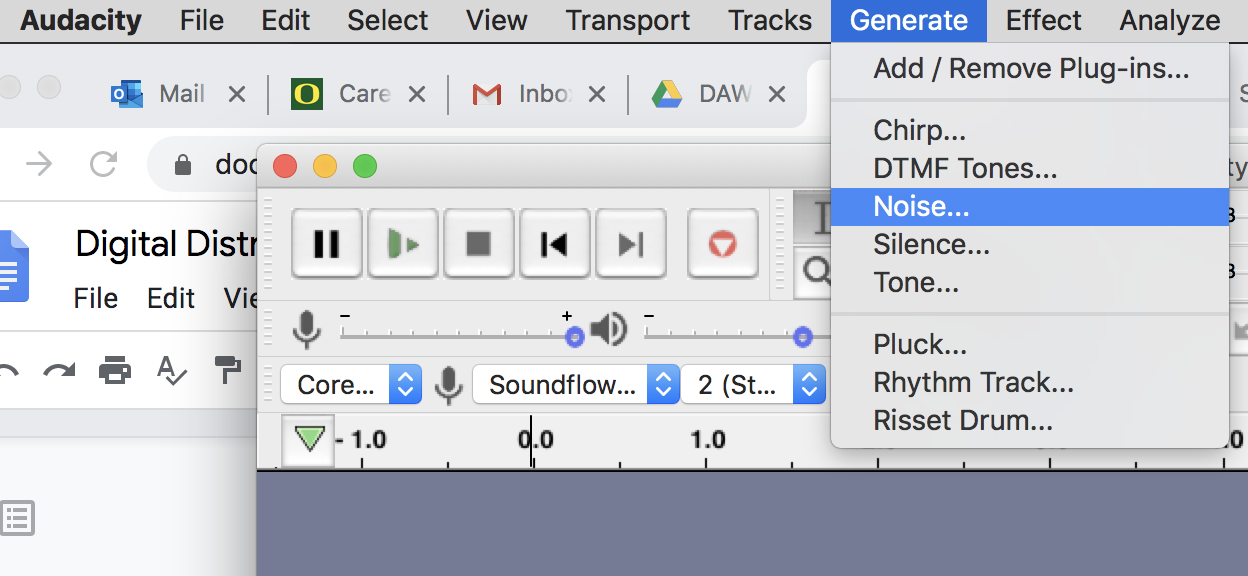
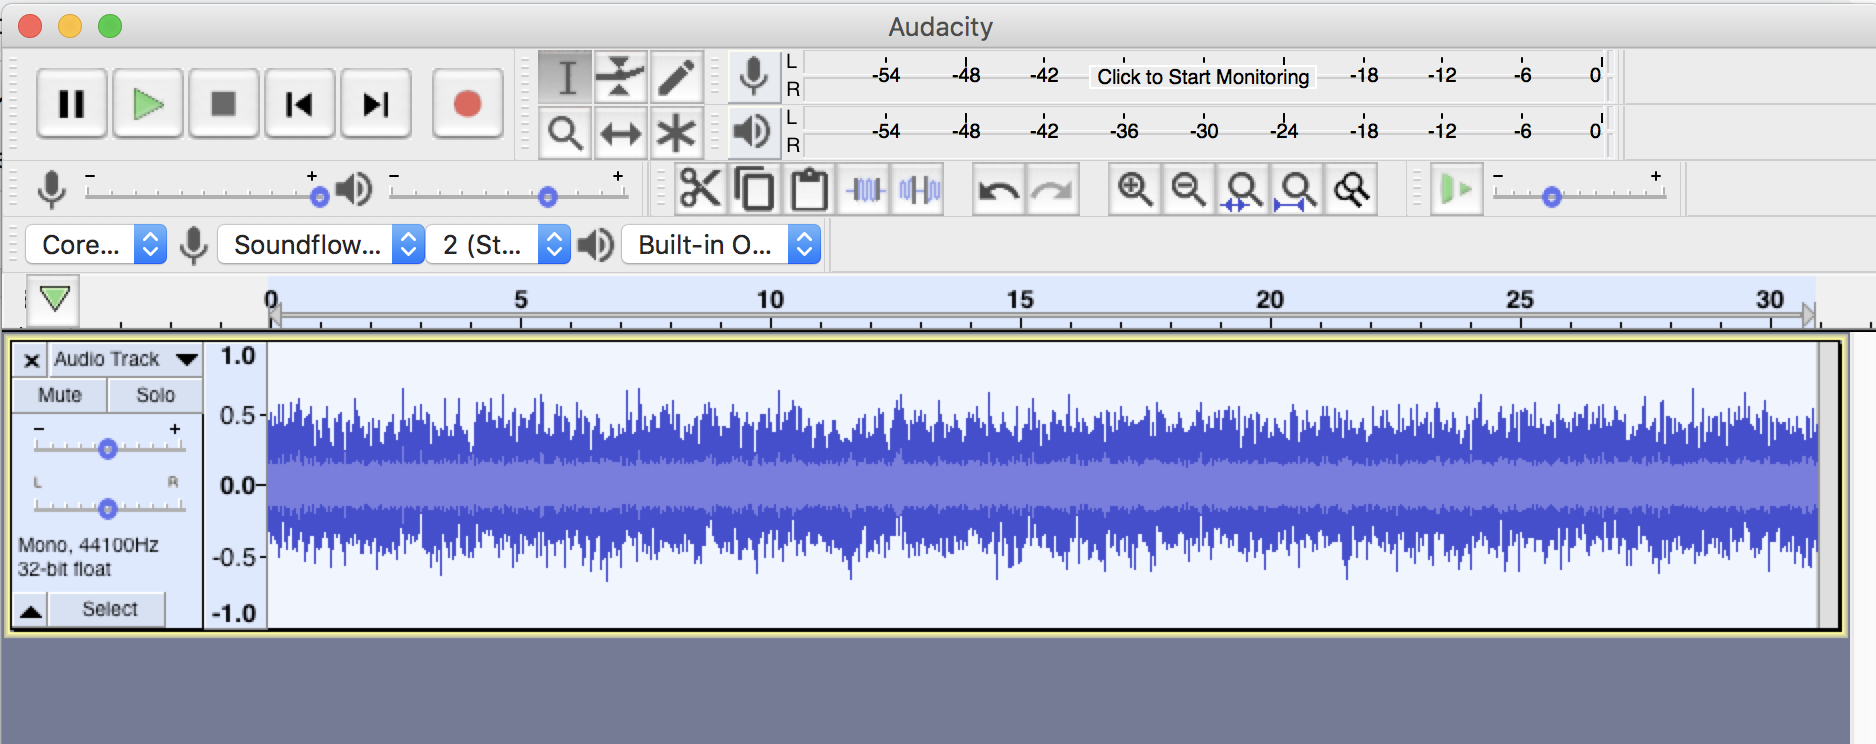
After selecting Generate > Noise… choose “Pink Noise” (of course you may choose White or Brown noise). Read about the differences here (link) (link). An amplitude of about 0.7 will work for pink noise as this will help keep the loudness units of the track in the correct range for streaming services. Read about LUFS here (link).
Choose the length to be between 30 and 40 seconds. We’ll want to choose the length to be ABOVE 30 seconds as streaming services (like Spotify and Amazon) only consider a “play” if thirty seconds of the track has been streamed. If you want your music to have “plays,” the tracks need to be longer than 30 seconds (footnote 1).

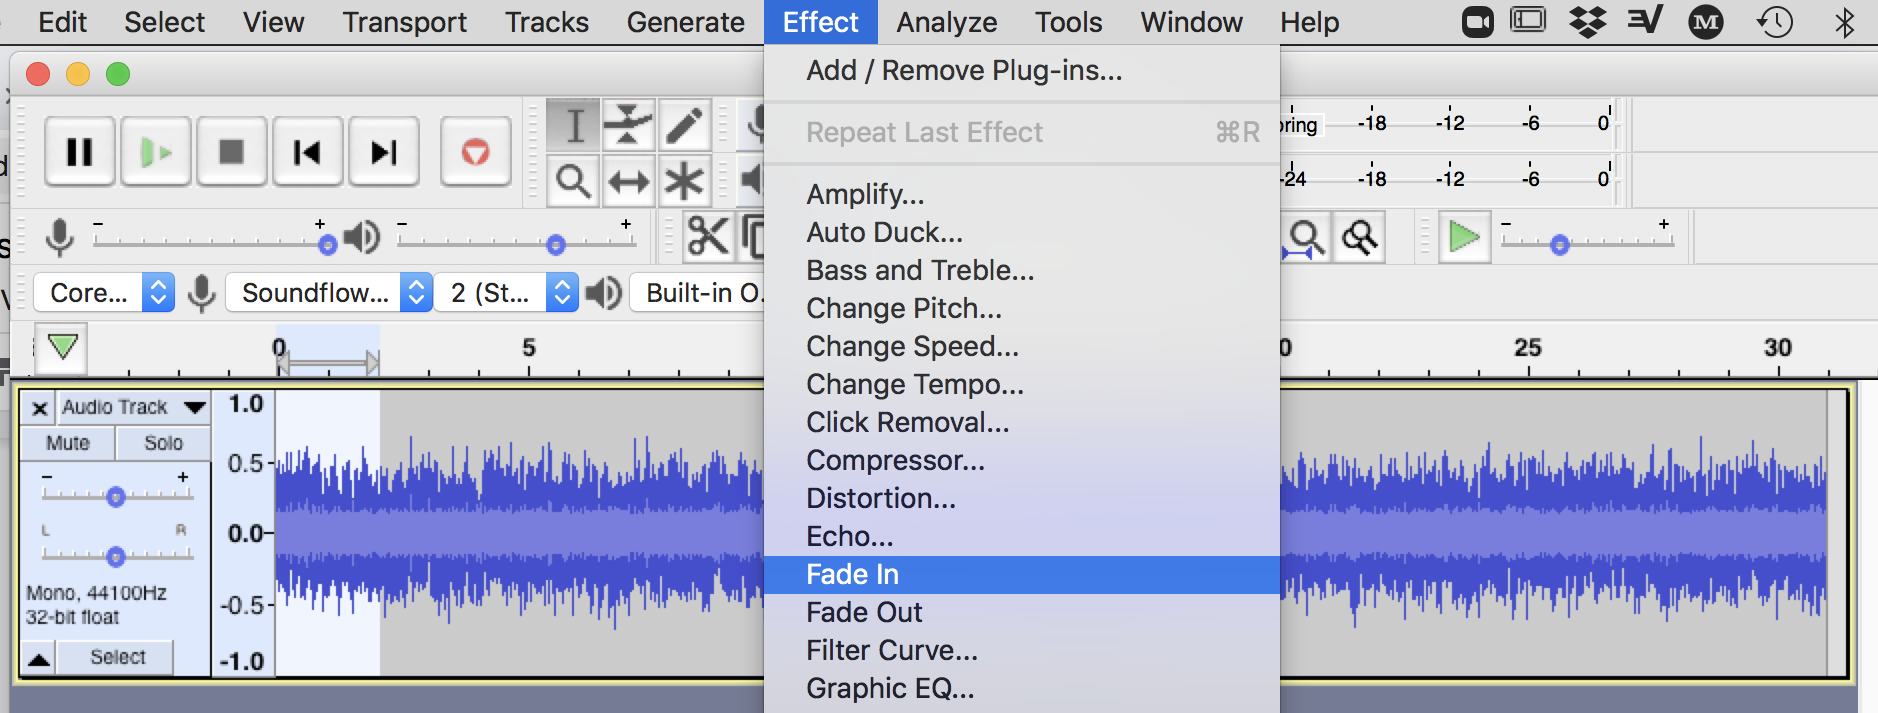
Next, we’ll need to add in fade-ins and outs. Without adding fades, at least one fade at the end, some digital distribution services (and ultimately some streaming service providers) will not accept the track as they do not allow hard ends to tracks. (note: if you are specifically creating a loopable track, then you should add “Loopable (No Fade)” to the track title to help get around this hard-cut moderation flag).

Export the track as .wav files 16-bit, 44.1k file. You may consider the export of the audio file as our “mixdown.” (Note: While some distribution services allow higher-quality tracks for import, our track settings get us close to our target output for this release). We are near finishing up our track, but we aren’t done. We should first listen to the audio file and then we may still want to “master” the track, or at the very least check out our loudness units (LUFS) relative to our target (streaming services) before preparing the file for distribution (footnote 2).
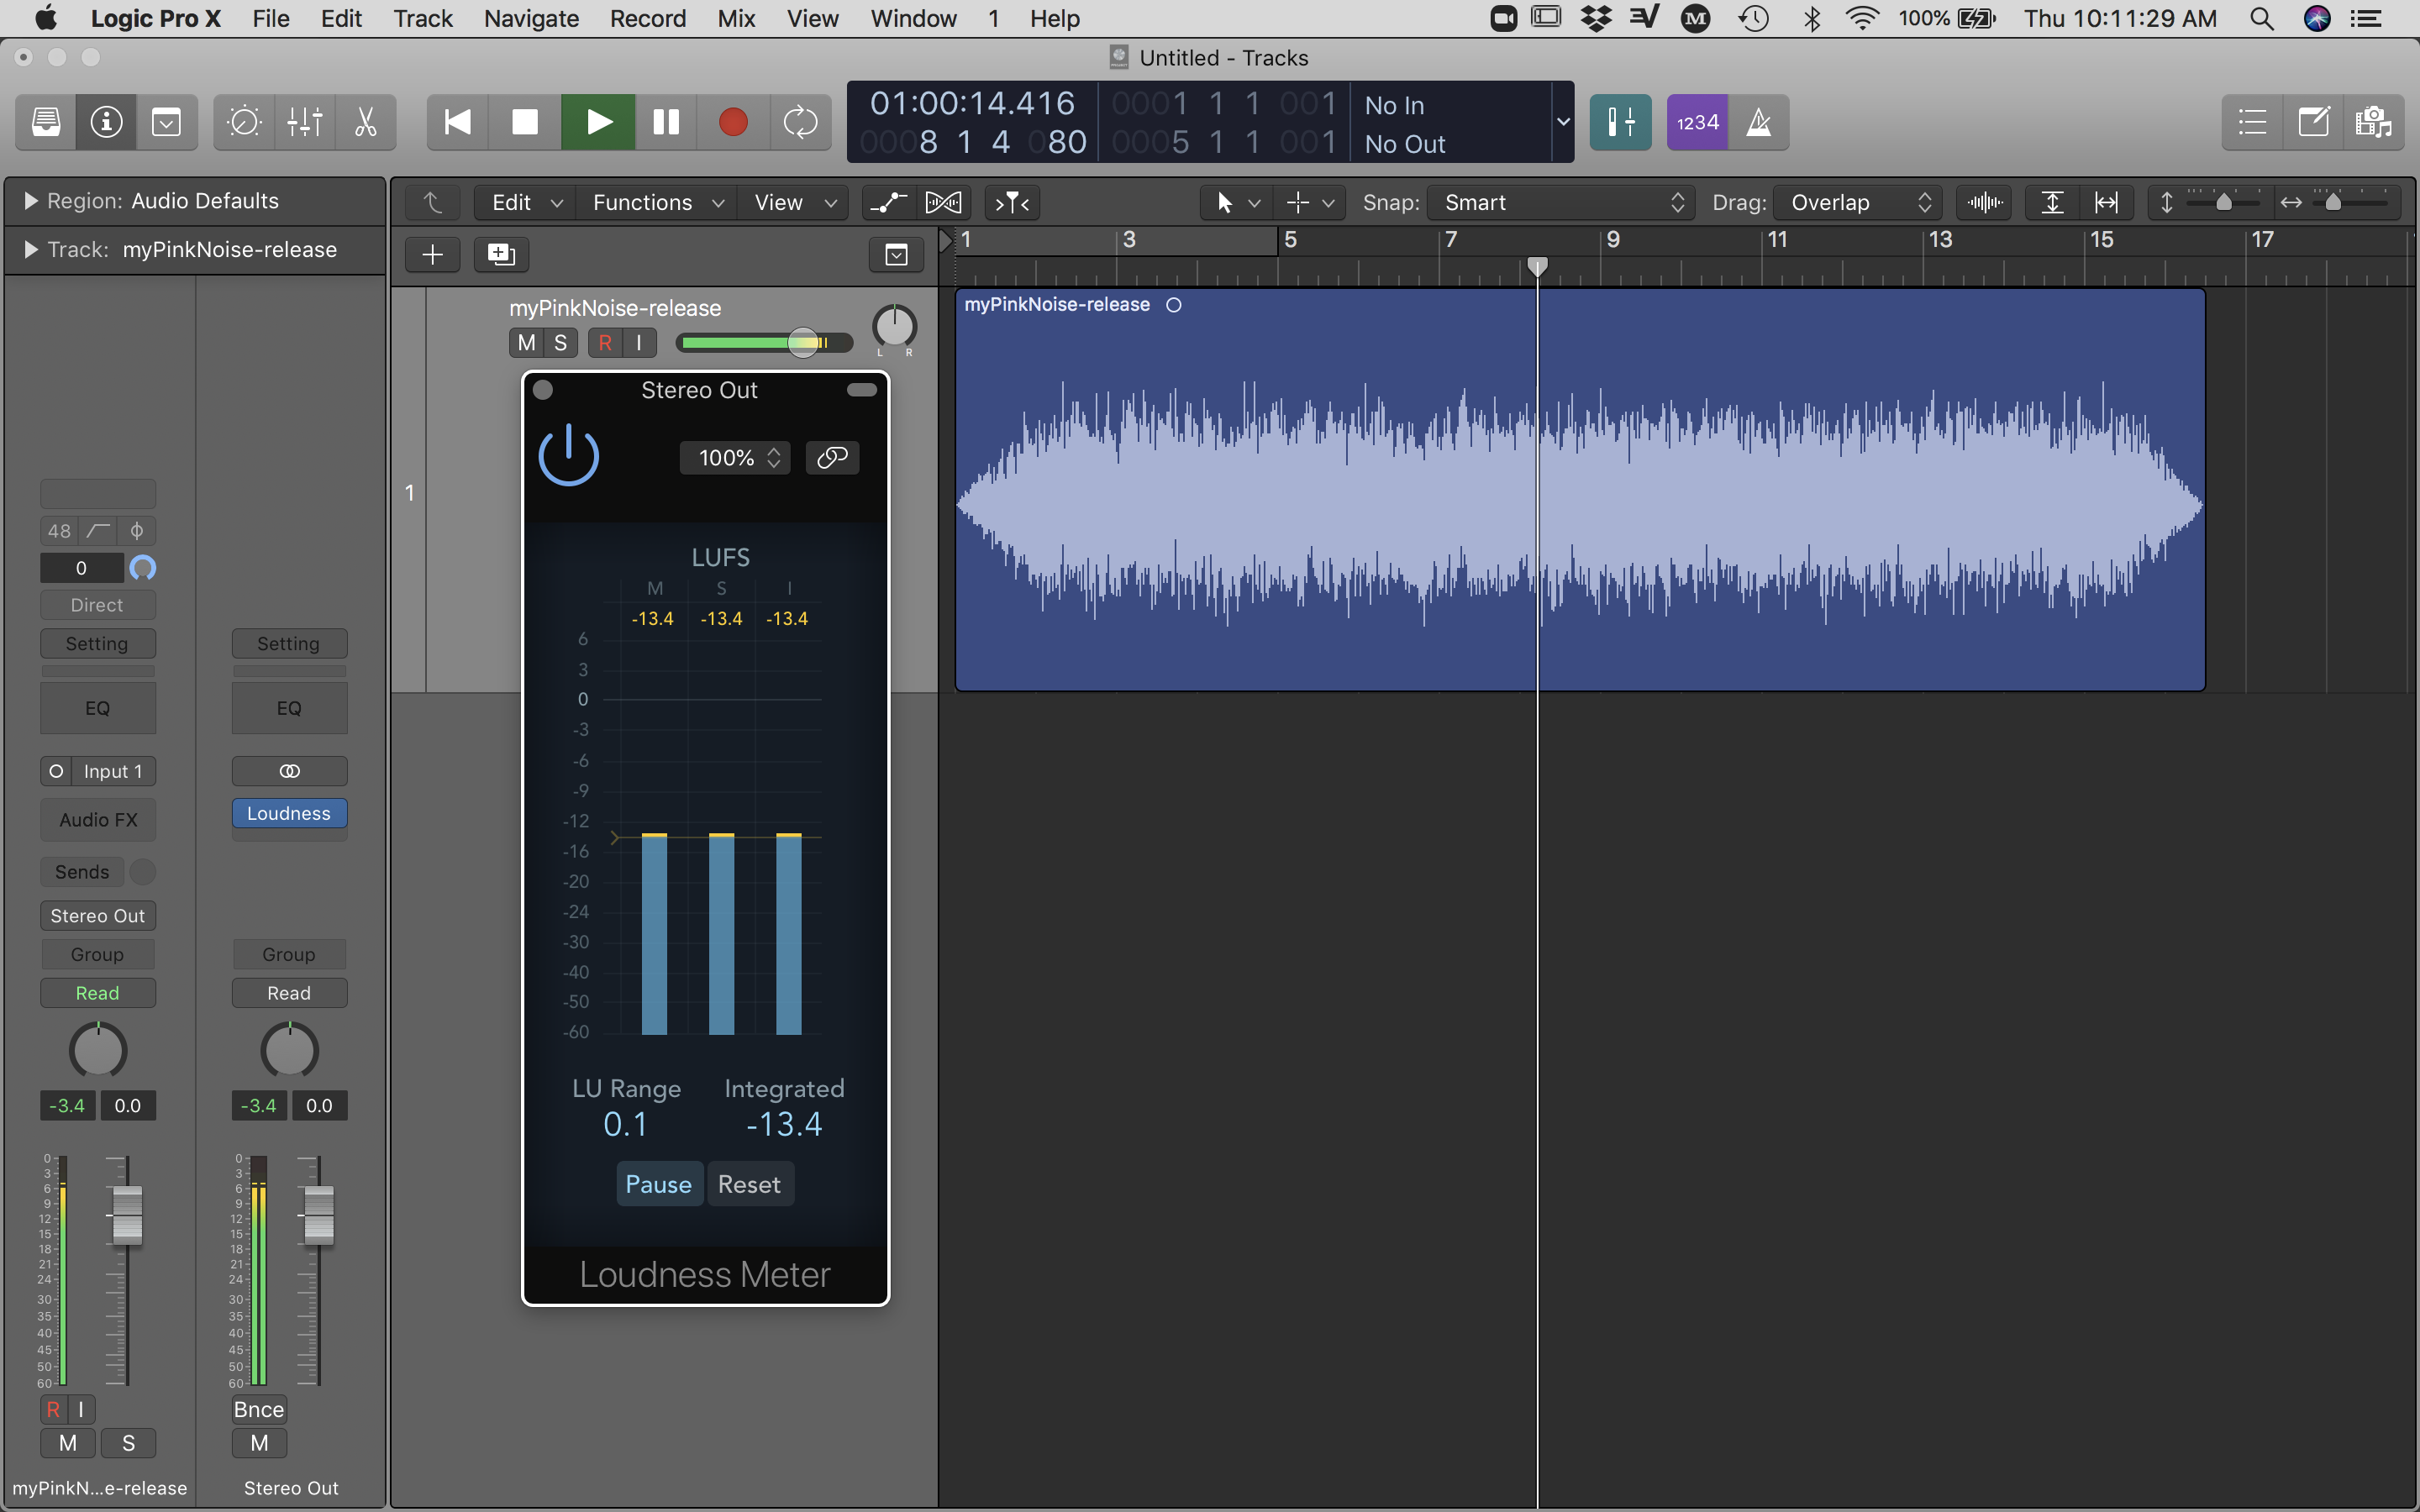
We can accomplish metering our track by opening our file inside any software that can meter LUFS and possibly control gain. If you need a free LUFS meter to quickly assess integrated LUFS, try Orban (url). Using Logic Pro X, I dragged and dropped the audio file onto the track and inserted a stock “Loudness Meter” plugin on the stereo buss. Playing back the track, the short-term and integrated meters are roughly -13.4dB LUFS. Since most streaming services use Integrated LUFS to alter the volume of tracks, a good range for most services is between -12 and -16dB LUFS. At the time of writing this, Spotify uses -14dB LUFS. (url) You may choose to alter the gain for the track or keep what you have. Since pink noise is already “mastered” in the production sense that it has equal energy per octave, I am choosing to not add any EQ, compression, or limiting, and I will instead stick with -13.4dB LUFS on my output meter.
If you did happen to alter the gain, you will either want to export out the “mastered” version as .wav or .aiff from your audio software or revisit Audacity to re-export another “mixdown” at a lower volume. Again, you will want to export out audio using uncompressed audio file formats (.wav or .aif), at least until you are ready to deliver to the distribution service.
2. GENERATE ALL MATERIALS ASSOCIATED WITH THE RELEASE
The materials for a release with a distributor include:
- Audio file in the correct format (FLAC, .wav, .mp3, etc) and output target volume (e.g., -14dB LUFS)
- Cover art for the single/EP/album
- Track title
- Artist name
- Album/EP title (if necessary)
- Choose a Genre (to categorize the music)
- Label name (if any)
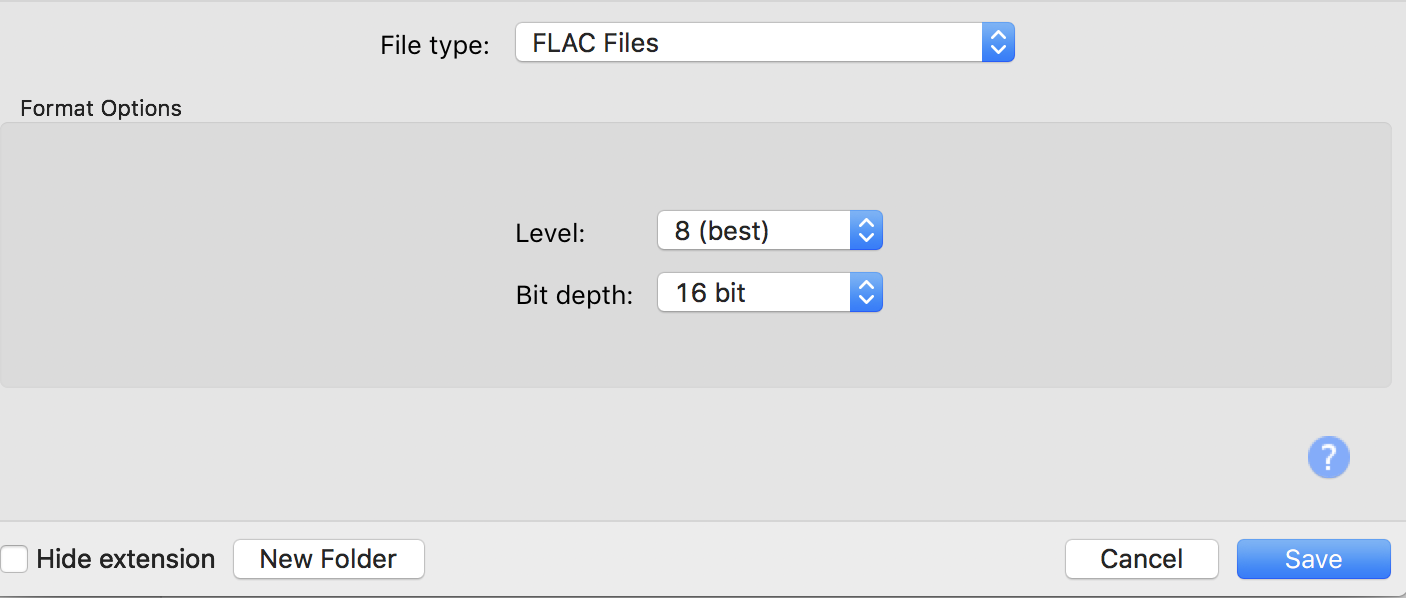
While we created a “mastered” version of the audio to be released, the target format may need to be altered before distribution. Services like CDBaby allow for uncompressed formats like .wav but others like RouteNote only take .flac or .mp3 file formats. Since FLAC is an uncompressed format and the distribution service for this walkthrough is RouteNote, let’s convert our “master” into a .flac file. Audacity software handles exporting out to this format. Just open up your mastered track in Audacity and export audio out as FLAC (footnote 3).
Note: you do not want to convert to .mp3 for your release as this not only reduces the quality, but may introduce short bits of silence (10-20ms) at the beginning and end of your audio track(s). So for the case of “Loopable (No Fade)” tracks, .mp3 conversion can actually print silence into the track and cause a quick burst of amplitude rupture on streaming services due to the added silence from the codec compression conversion. This has nothing to do with buffering.
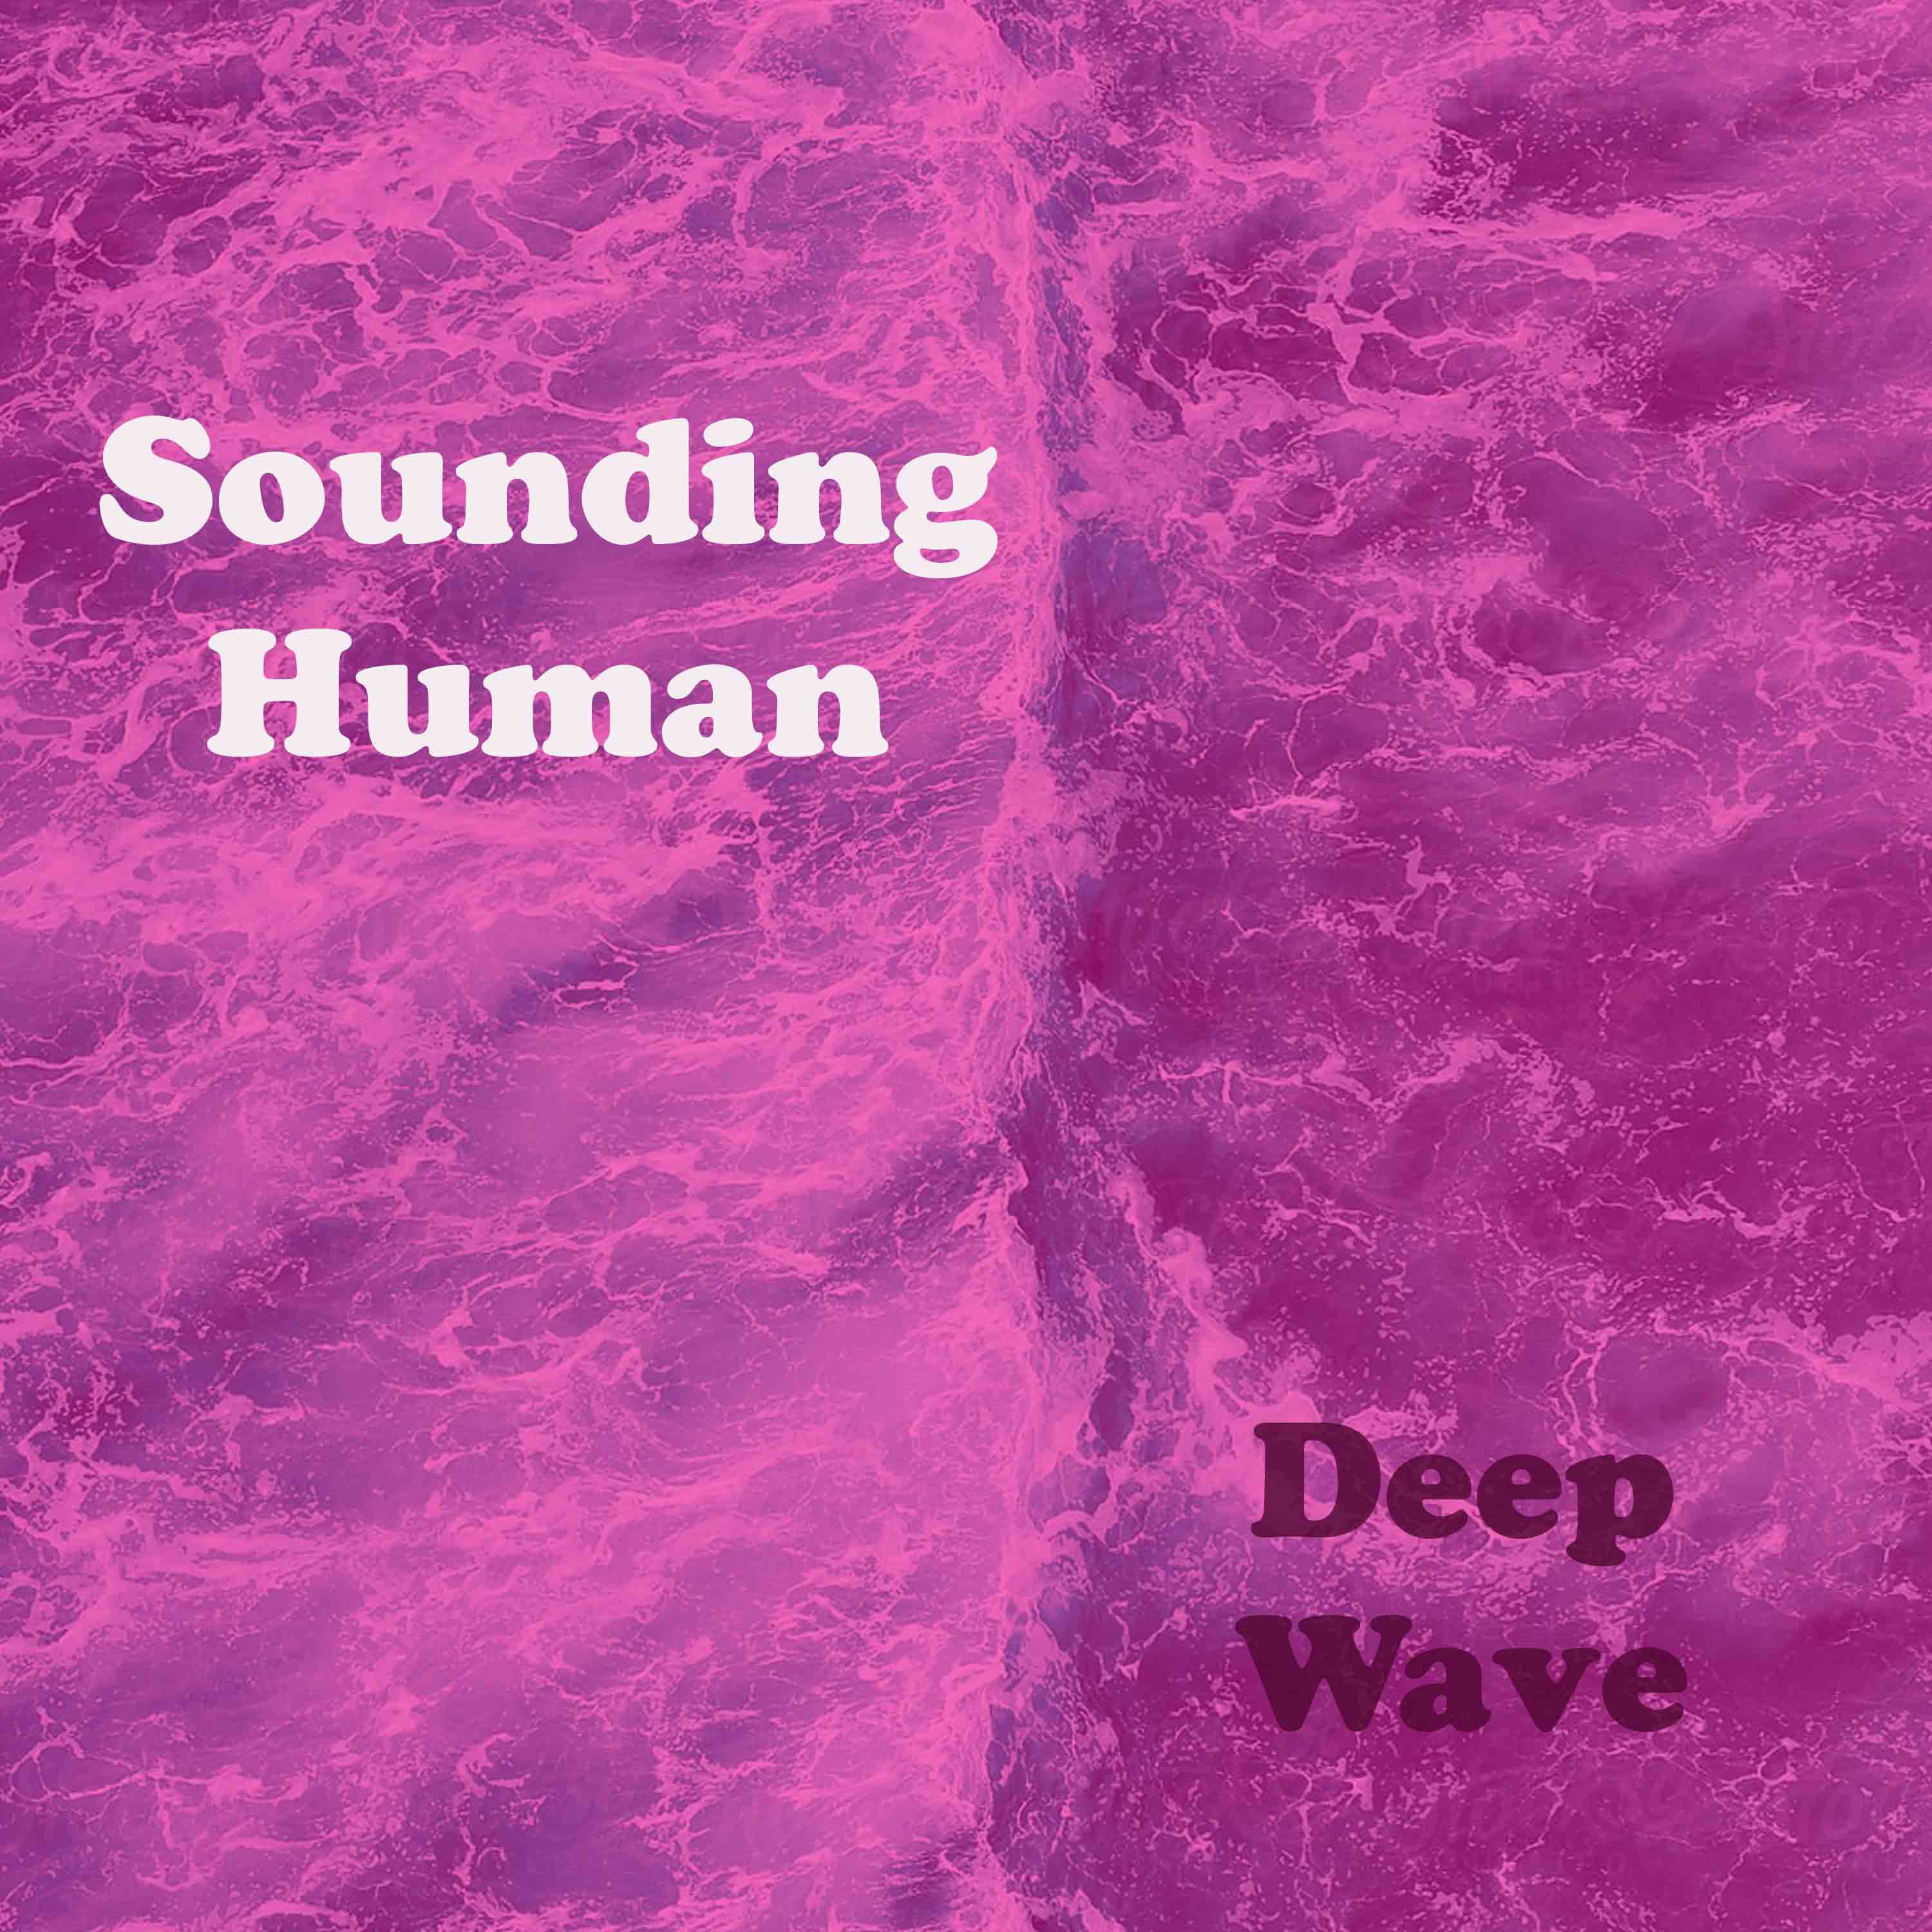
The cover art doesn’t need to be fancy, it just needs to fit the specifications. At the time of this writing, RouteNote has an image database that’s free to use and a photo resizer. If you want to make your own, RouteNote requires 3000×3000 pixel .jpg files. Just find your favorite pink color (RGB or Hex color) and fill a 3000×3000 pixel canvas with this color. I use Adobe Photoshop, but any free image editing software will do. Most other distributors also have free tools you may use to generate cover art. And should you choose to add images as part of your cover art, make sure you have permission first (again RouteNote has a free image database).

For this walkthrough, naming may be the hardest part. Maybe? Did I prime you to overthink it? Come up with an artist name and a track title. Just relax and let the word association flow. Seriously. Track titles can be anything— scientific “Equal Amplitude Per Octave”; direct “Pink Noise with fades”; spiritual “Soothing Pink Noise”; or cheeky, “Pink Panther’s Pink Noise”. The point is to pick a title and move on. The walk-through is about getting comfortable with the process, not to get bogged down by the details— that is, a “perfect” name. Sidenote: you cannot use “Untitled” or “No name” as these generic titles can be flagged by the distributor. You should do a quick word association for the artist name as well… remember, you never have to use your artist name again, but you must pick a name.
Afterward, you should get on a streaming service (here) (here) or (here) and do a quick check to make sure your new artist’s name doesn’t match existing artists (unique names make searching easier, and your work/streams will be attributed to you without added hassle).
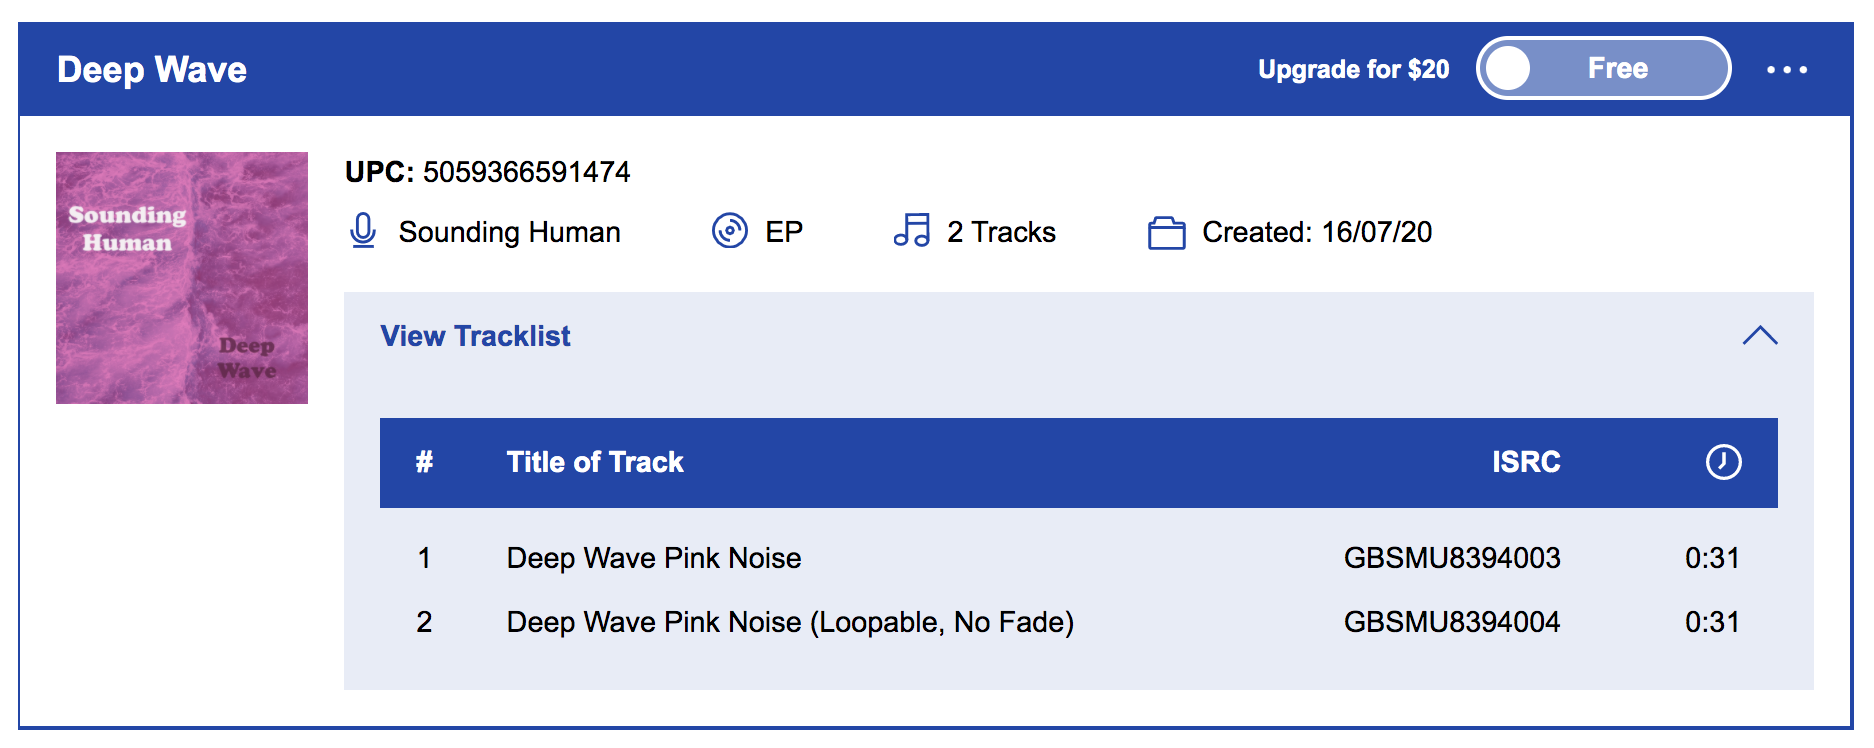
Here’s what I came up with for my track (ie. You shouldn’t use. Now on Spotify)
Artist: Sounding Human
Album/EP title: “Deep Wave” EP (can also be same name as your track)
Track 1: “Deep Wave Pink Noise” and
Track 2: “Deep Wave Pink Noise (Loopable, No Fade)”
Ready to move on? What? No?! Seriously? You don’t have a name yet? Use the letters from your name in this anagram maker. (url) Take one of the top five that appears. This is your artist name.
3. REGISTER WITH ROUTENOTE DISTRIBUTION SERVICE
Register with RouteNote. (url) On the RouteNote page, click on the “Join RouteNote” button. All you need is your email and a username. If you have an account already, just log in (footnote 4).
For any release, you have to pick a distribution service (DistoKid, RouteNote, CDBaby, Mondotunes, ReverbNation, Landr, Awal, Fresh Tunes, Tunecore, Chorus Music, Symphonic, etc). You don’t have to choose the same service in each release, but you cannot release the same music on multiple digital distribution providers. I’ve chosen RouteNote as it’s free to release, will keep your music up after you release, and satisfies the purposes of this walkthrough. Fun fact: you also can share revenue with this service. Please note that all distribution services take some sort of cut, whether upfront in fees, or later on in streaming. You always retain the rights to your music. For a full list comparing all the services check out Ari’s Take (url).
4. DISTRIBUTE YOUR WORK
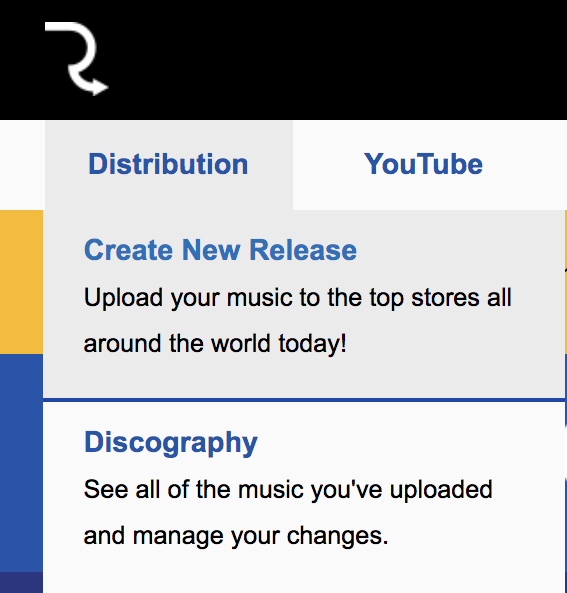
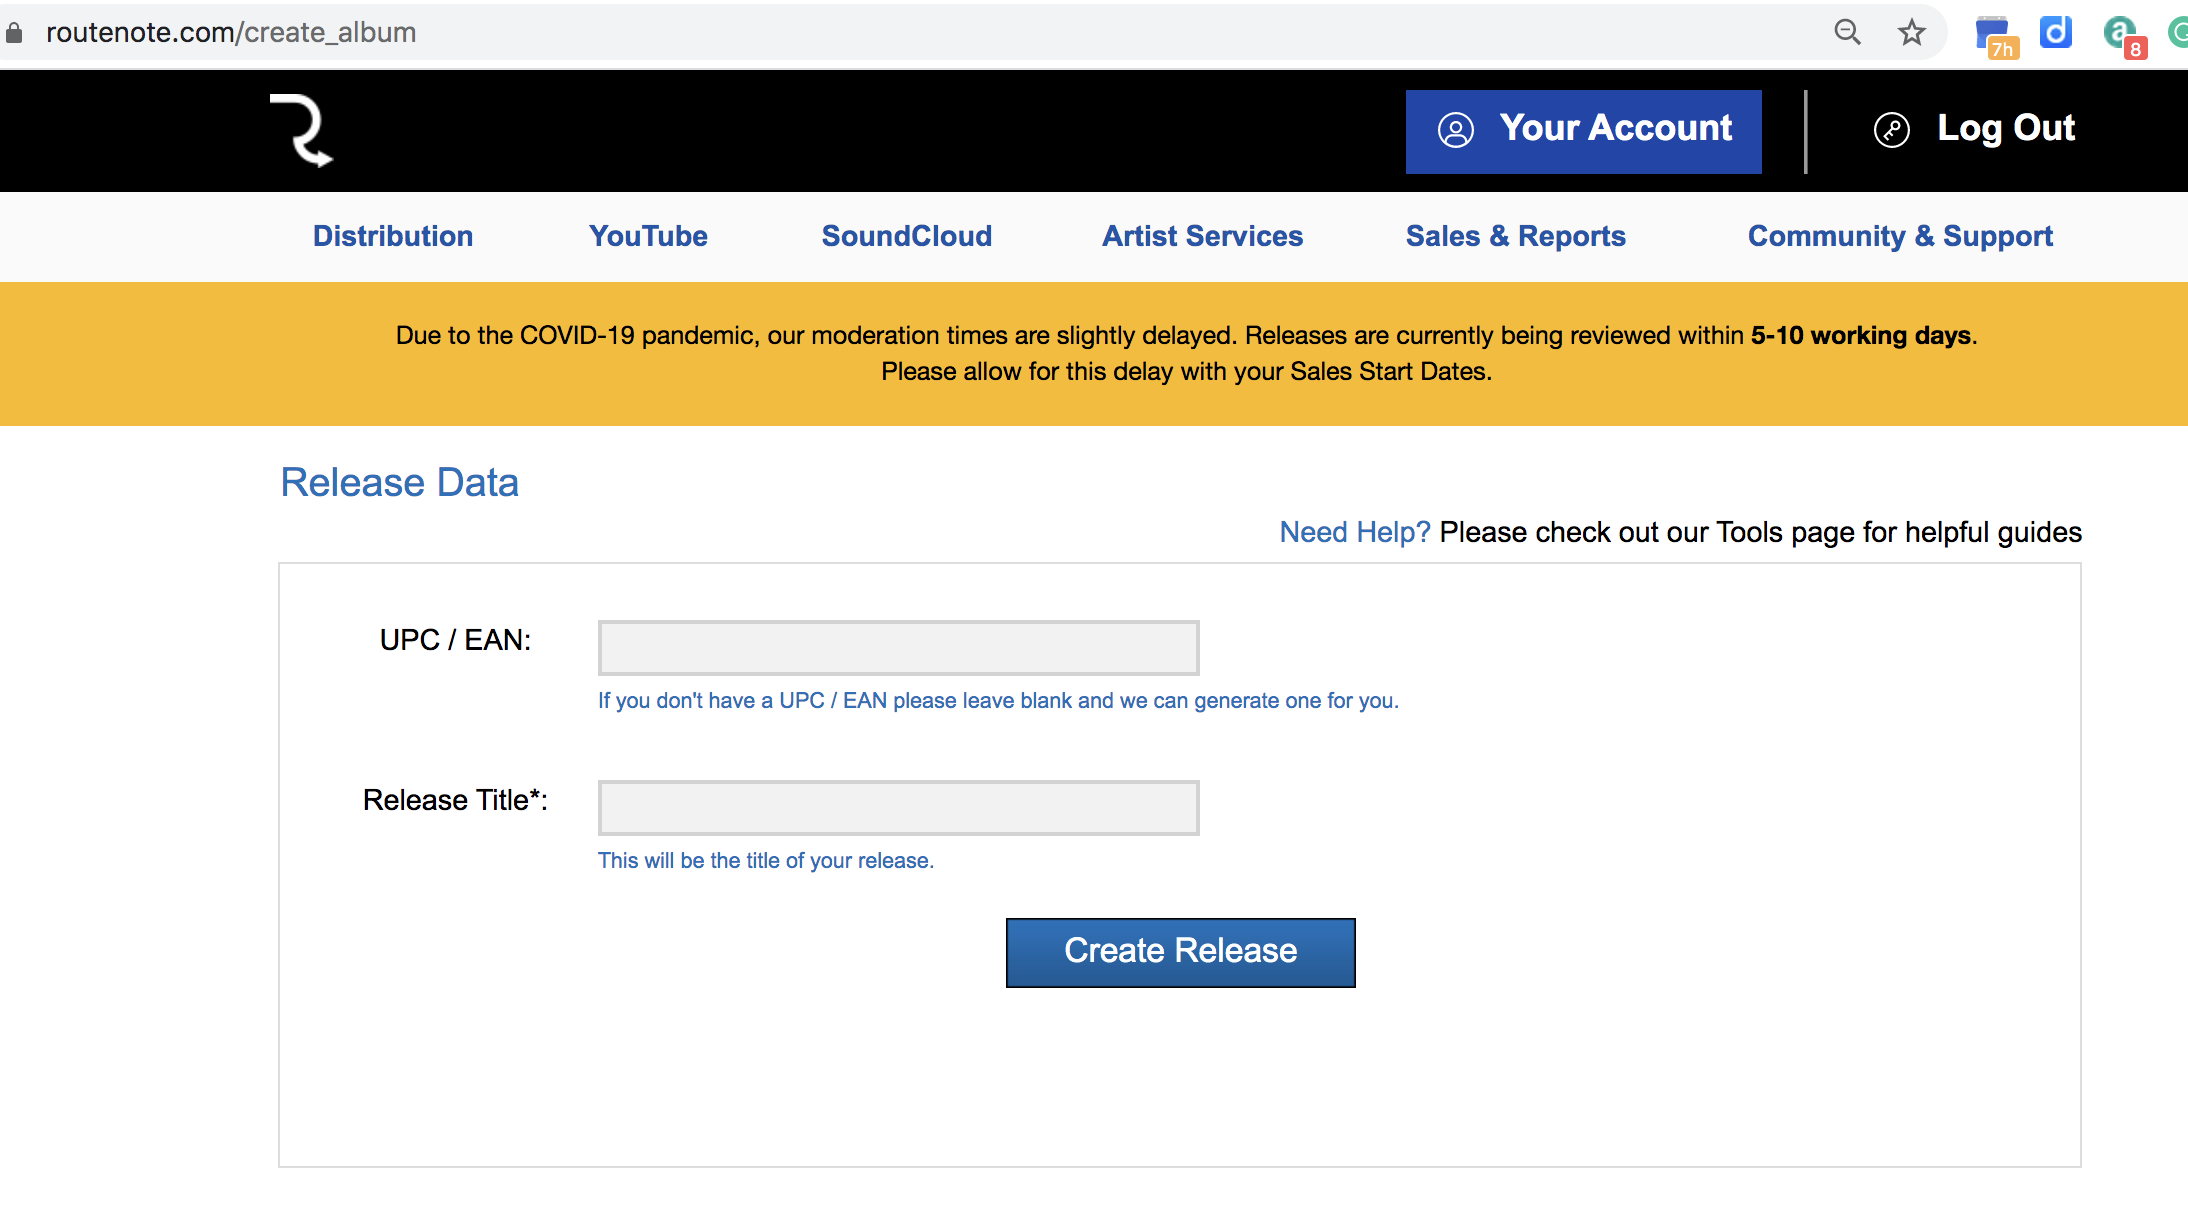
Ok. You’re ready to create your release with the distributor. Just log in to RouteNote and click Distribution > Create Release.
You’ll need to add your track title (or EP or Album title) to the release. Don’t worry about the UPC as RouteNote assigns you one for free. A UPC is a universal product code associated with the release. Think of it like a barcode that you see on a CD or LP. The UPC is specific to YOUR single/EP/album. Some services, like CDBaby, charge for this. It’s free here.
After the initial title name and receiving a UPC, there’s a four-step process to the release that we have prepped for in step 2.
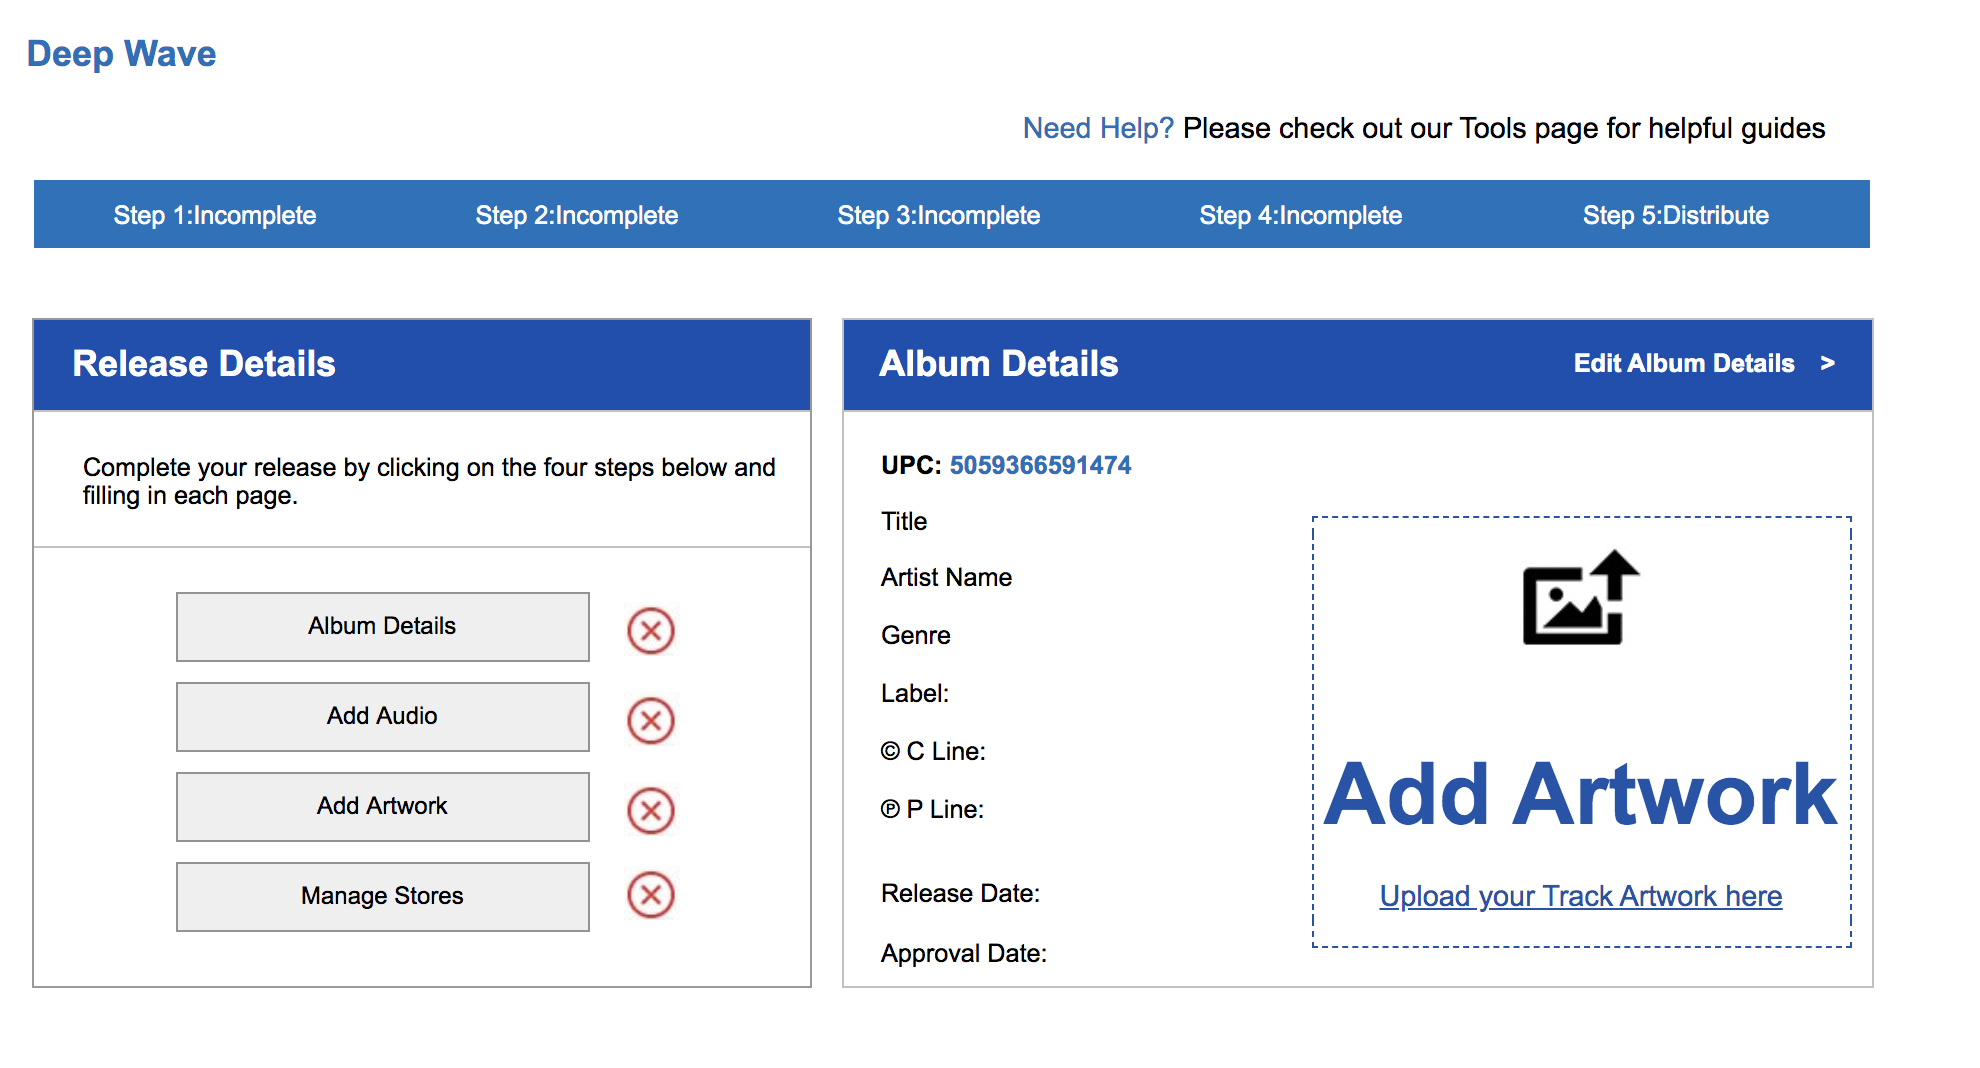
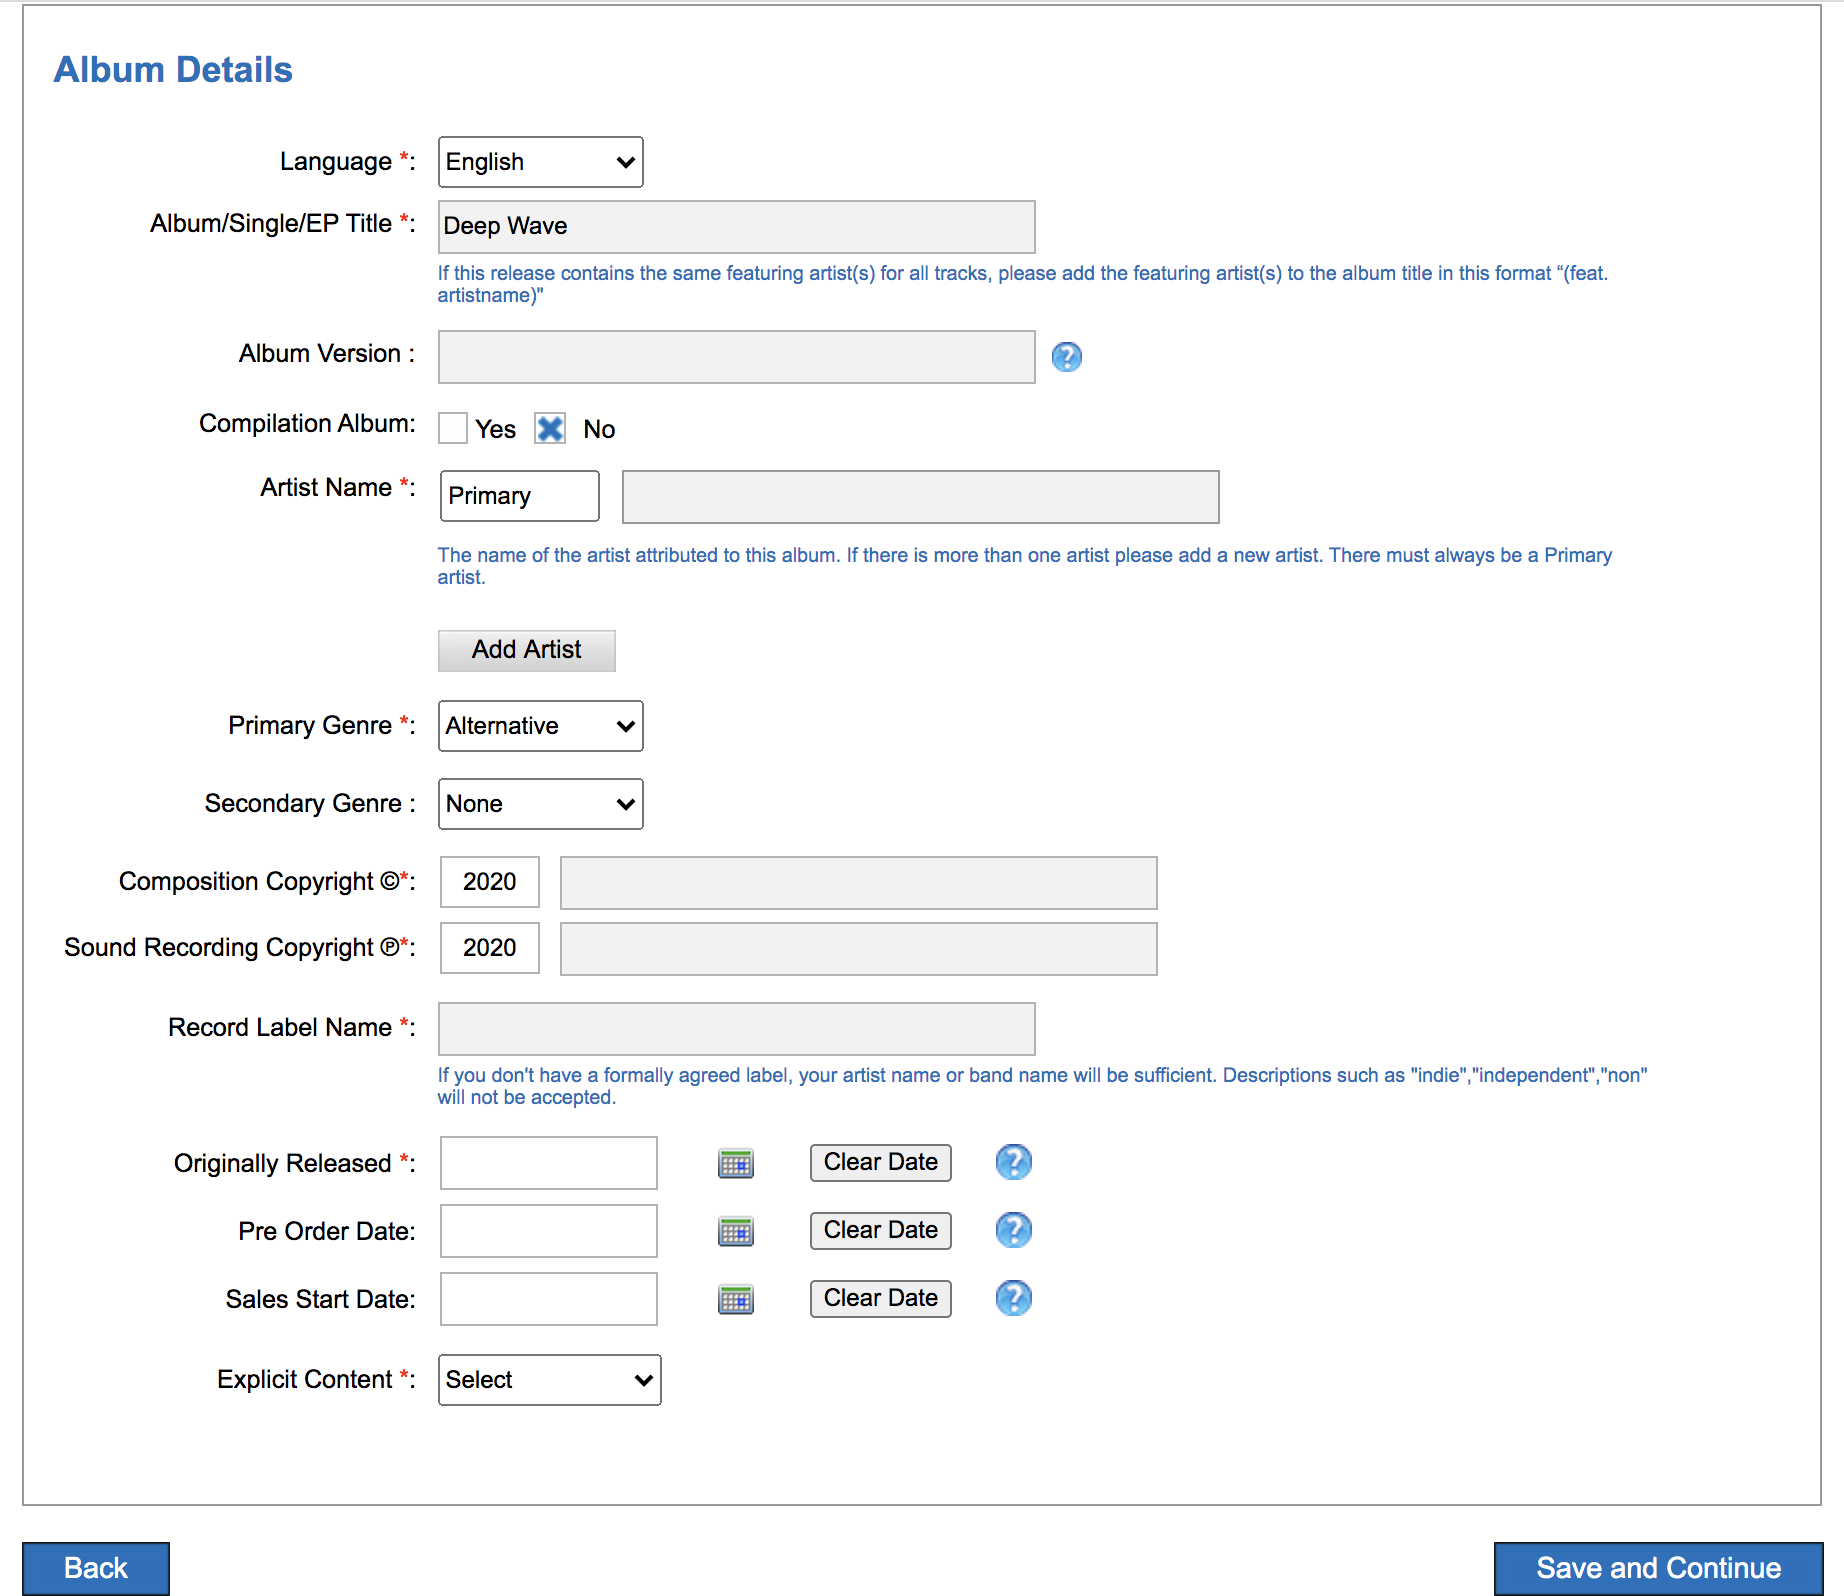
1. Album Details. See the image below for all fields. You may choose to use your own name for C and P copyright, although you may use the artist name. C is for the underlying composition (the written music) and P is for the recording (what the artist records). Often, the C and P lines on the record are attributed to the record label (e.g., Sub Pop, Matador), but not always. You’ll also need a genre, but for something like pink noise, maybe “Easy Listening”? A note about release date. If you are setting this up for music release, you’ll want to time this in advance and have an album release strategy. As Bobby Schenk, digital marketing manager for Dub-Stuy records, puts it, “Include the 7-10 day delay in your release strategy. Release earlier rather than later with a scheduled release, as you’ll need to align with your PR machine.”
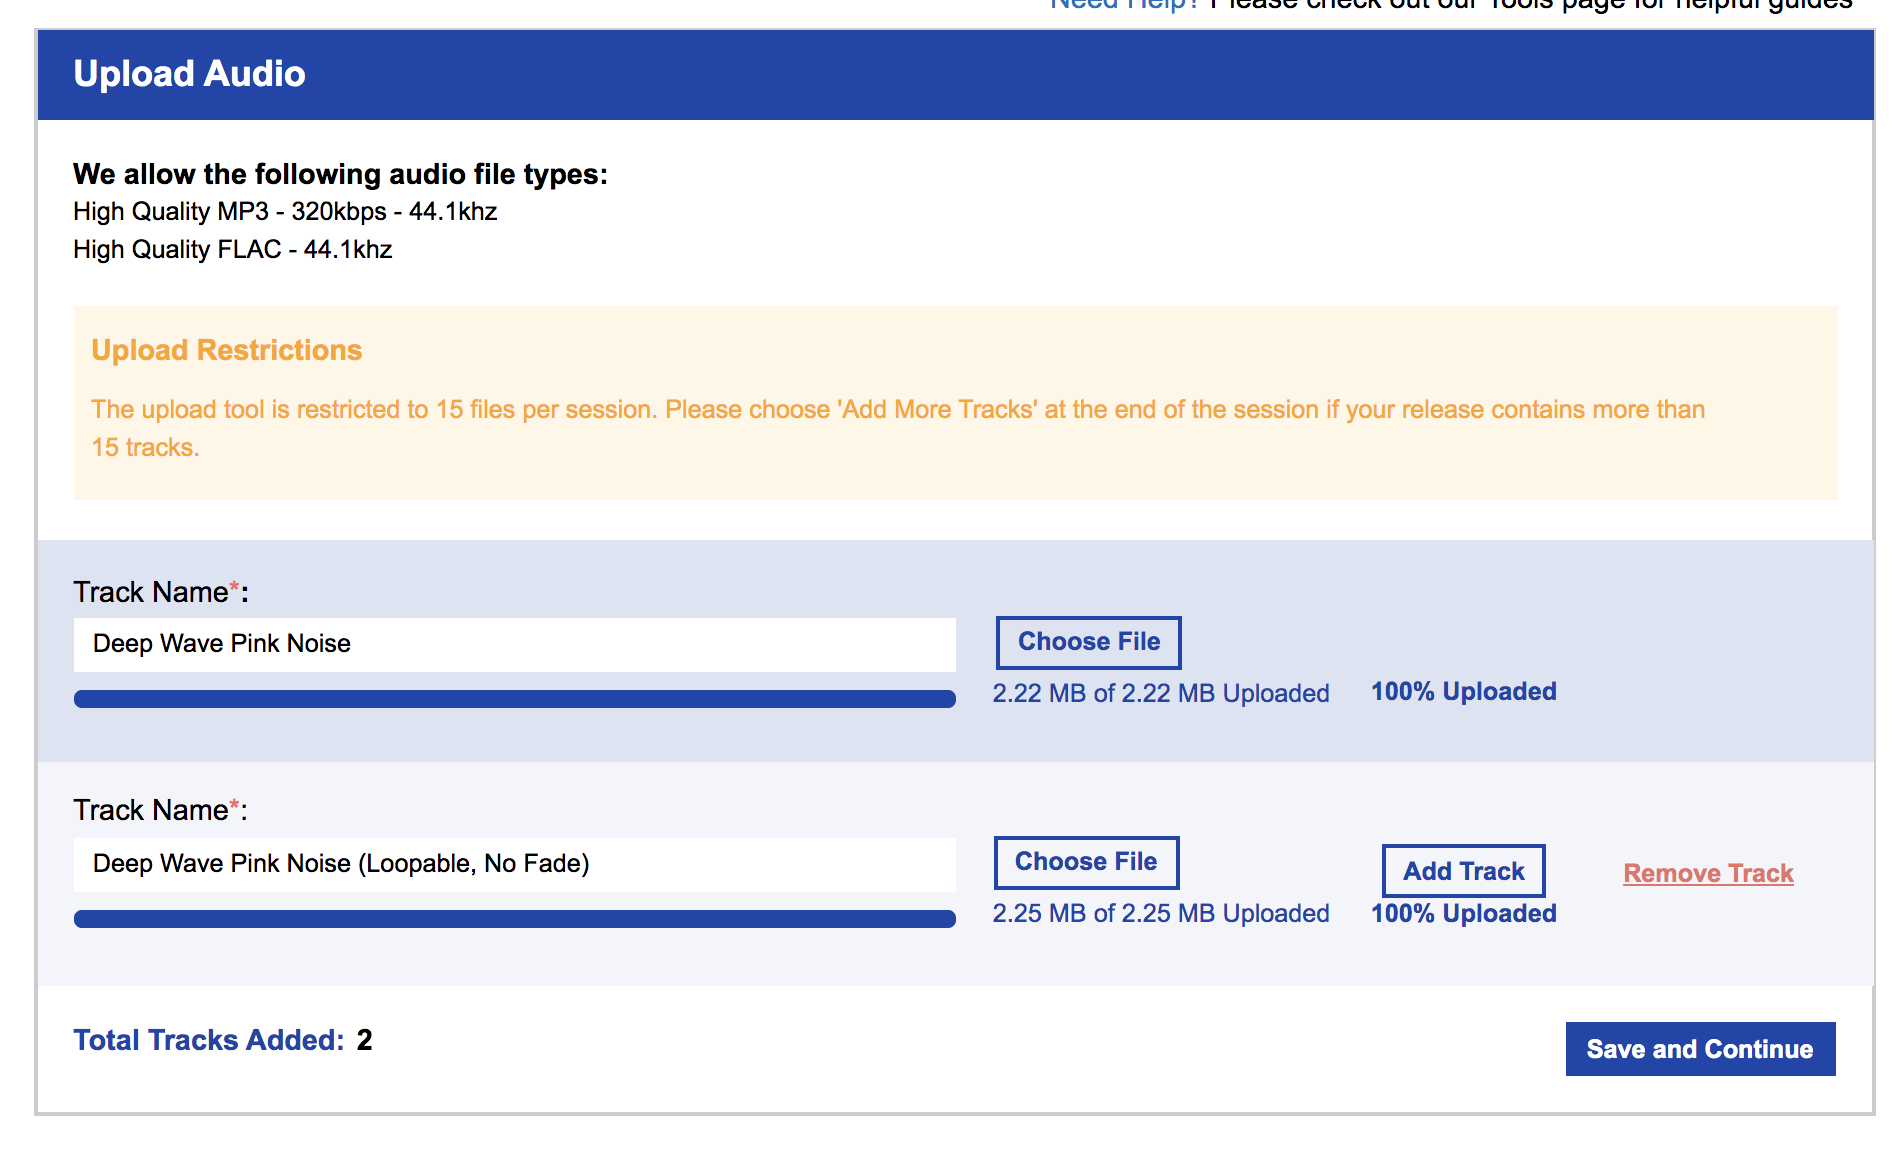
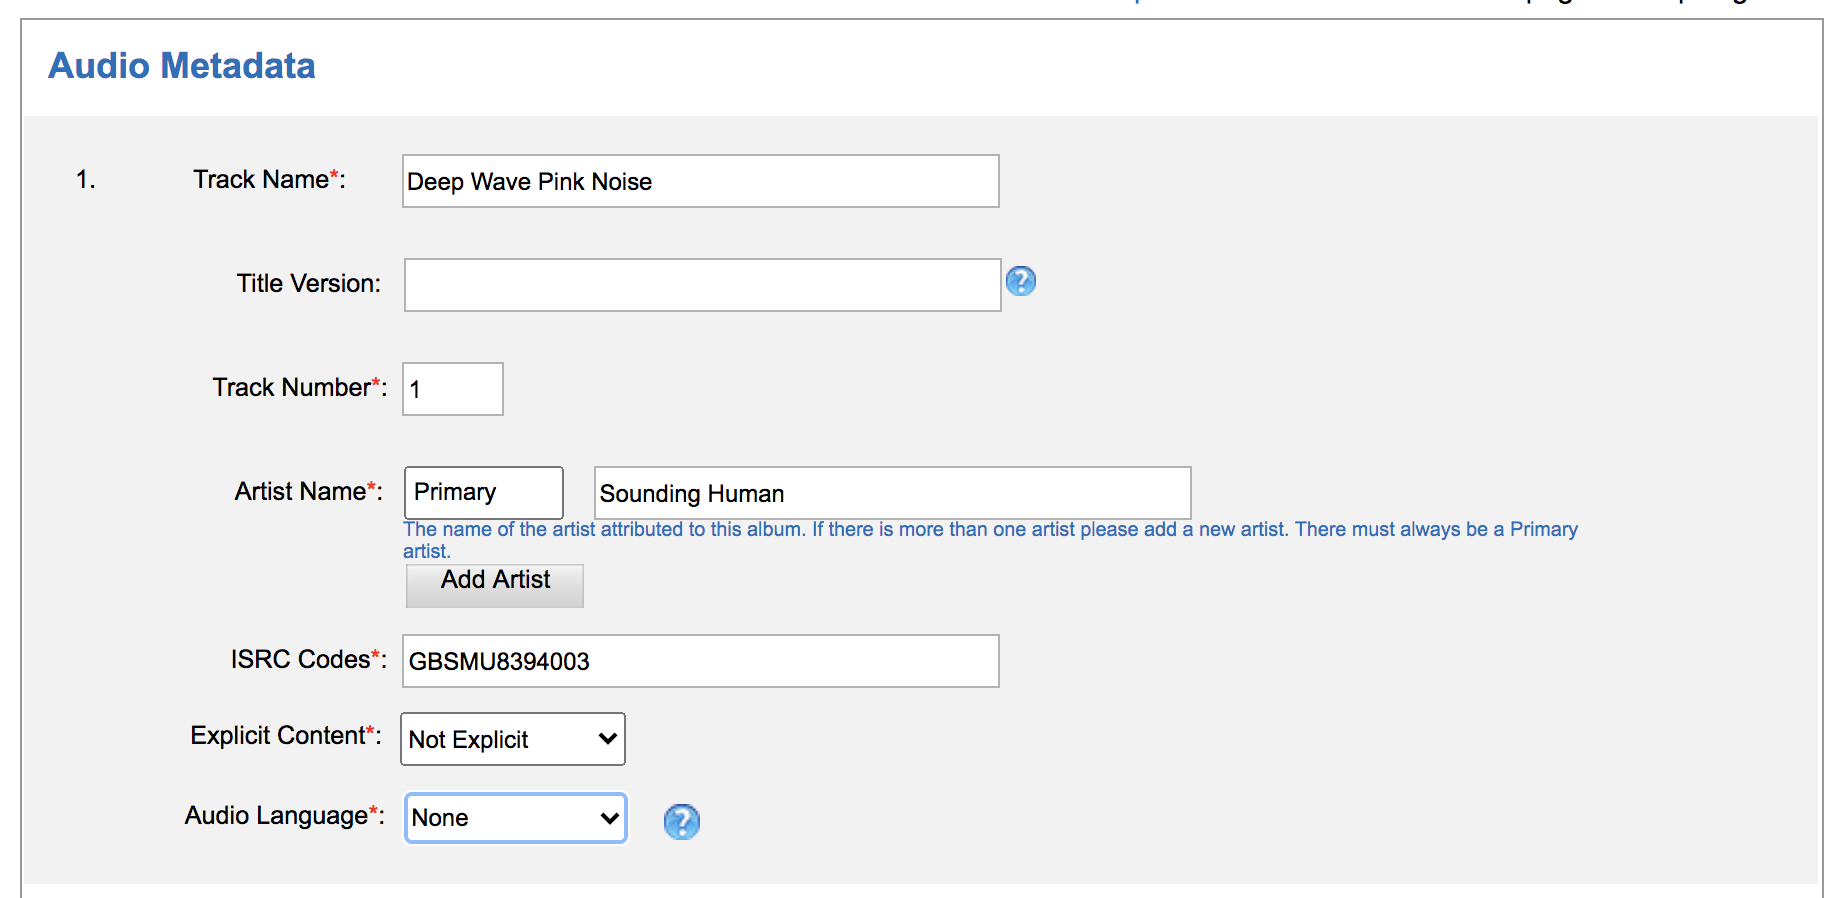
2. Add Audio. This is where you’ll upload ALL audio files. You’ll need the track name, but you’ll be asked to assign some additional metadata to each track (if you’re uploading more than one track). Since the track is pink noise with no lyrics, there will be no language associated with the track. Your track will be assigned an ISRC (‘International Standard Recording Code’) and that ISRC is attached to the recording, not the underlying composition. ISRCs are one important way for tracking streams (read royalties) as they are individual barcodes to the musical recordings. Read about ISRC (url). Read more on composition vs recording (url).
3. Add Artwork. We’re halfway there! Next, we need to upload our album/single cover art. Remember, the guidelines are hi-resolution files, and for RouteNote that is 3000×3000 jpg files only.

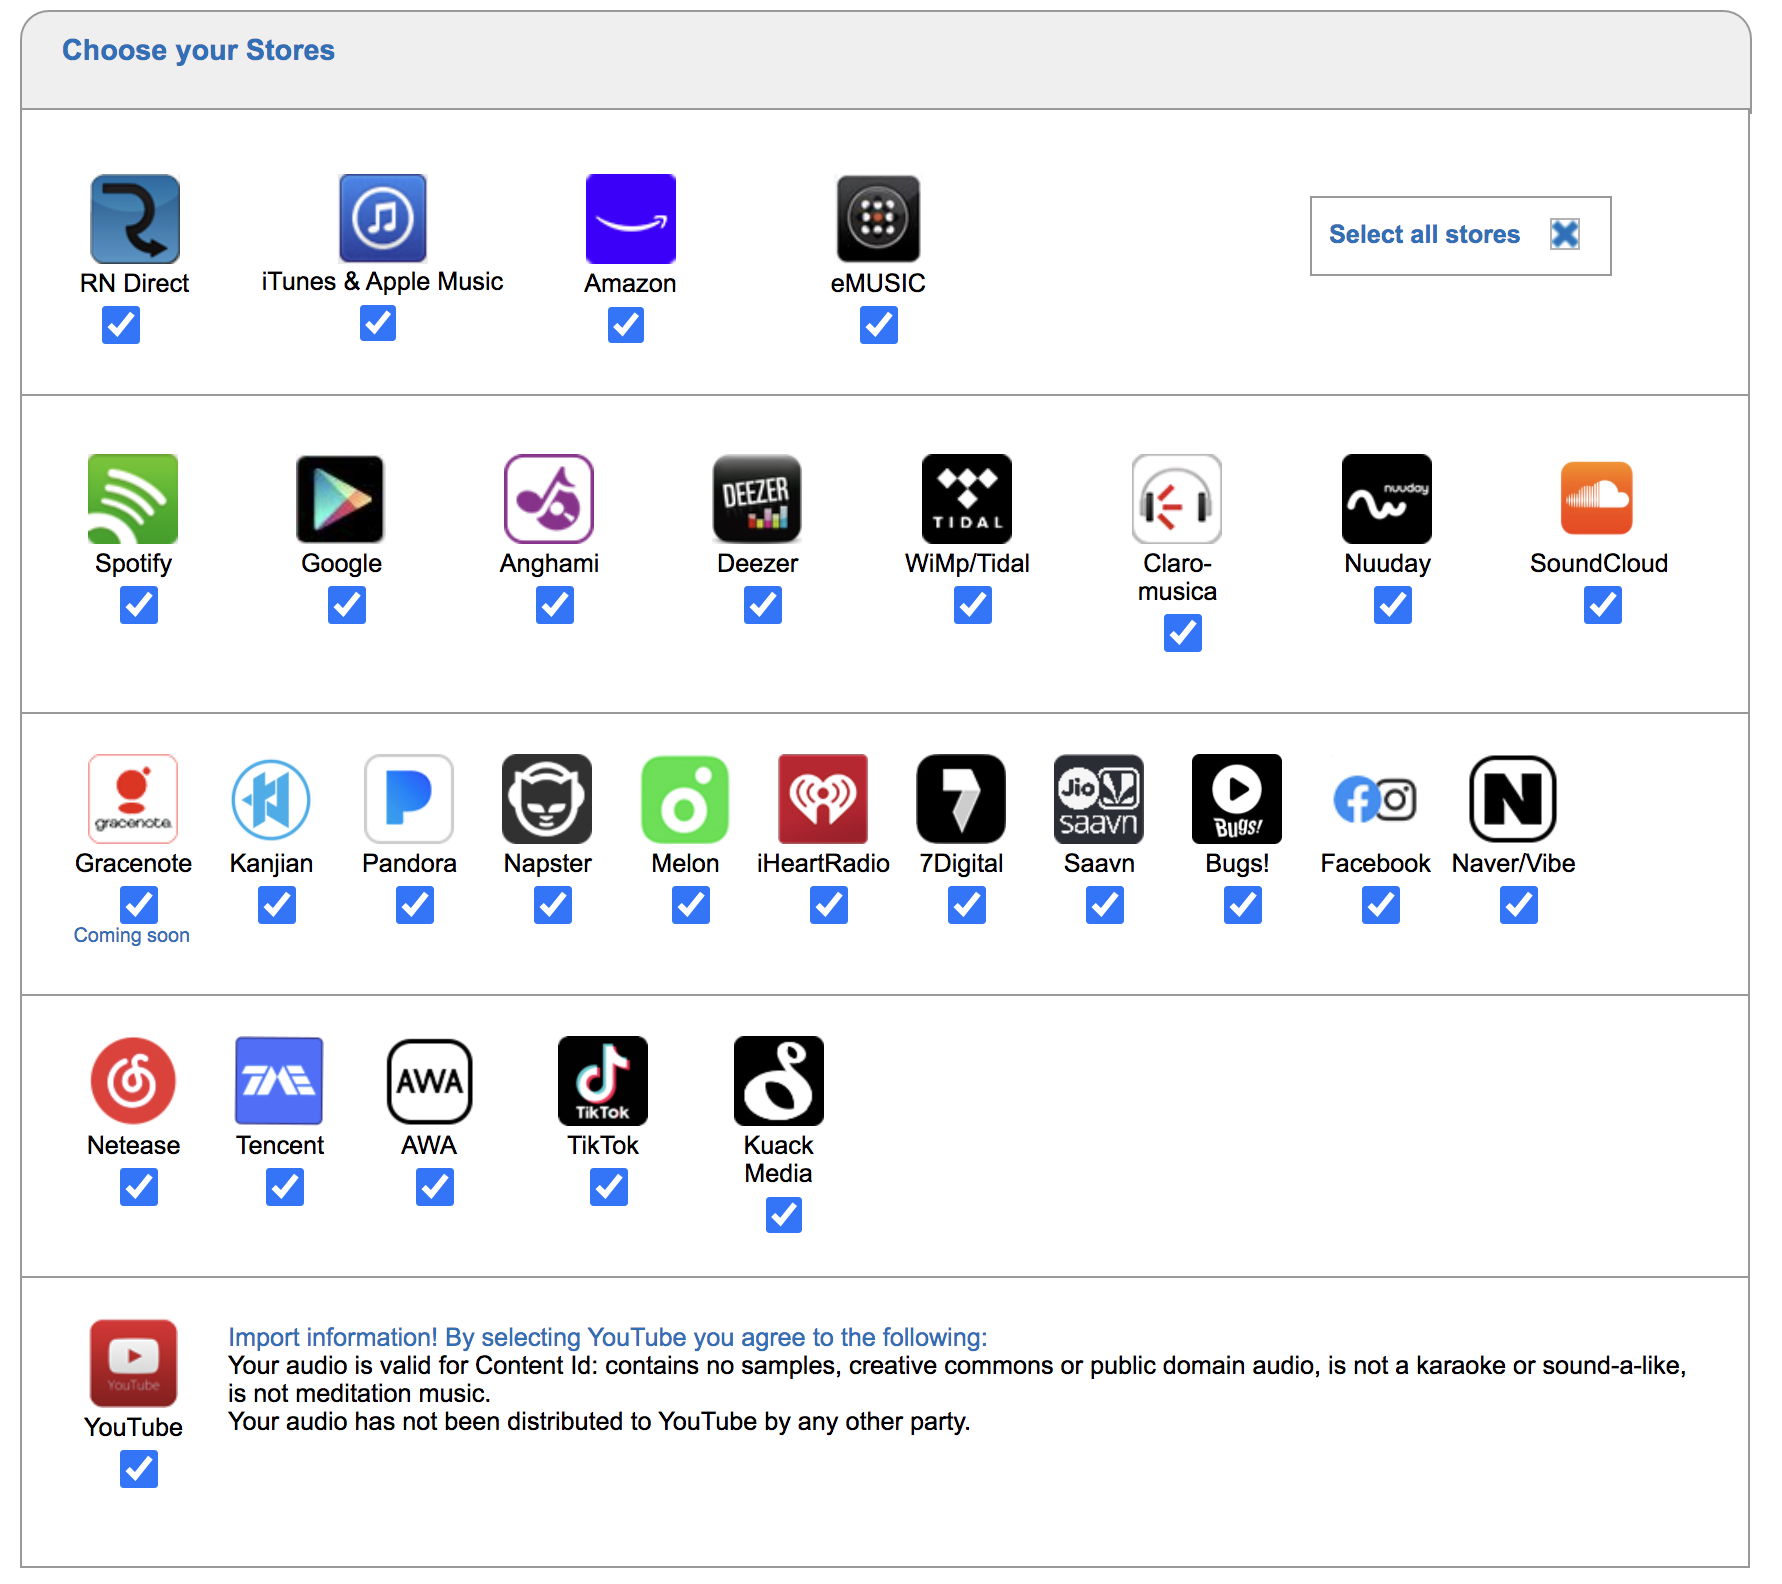
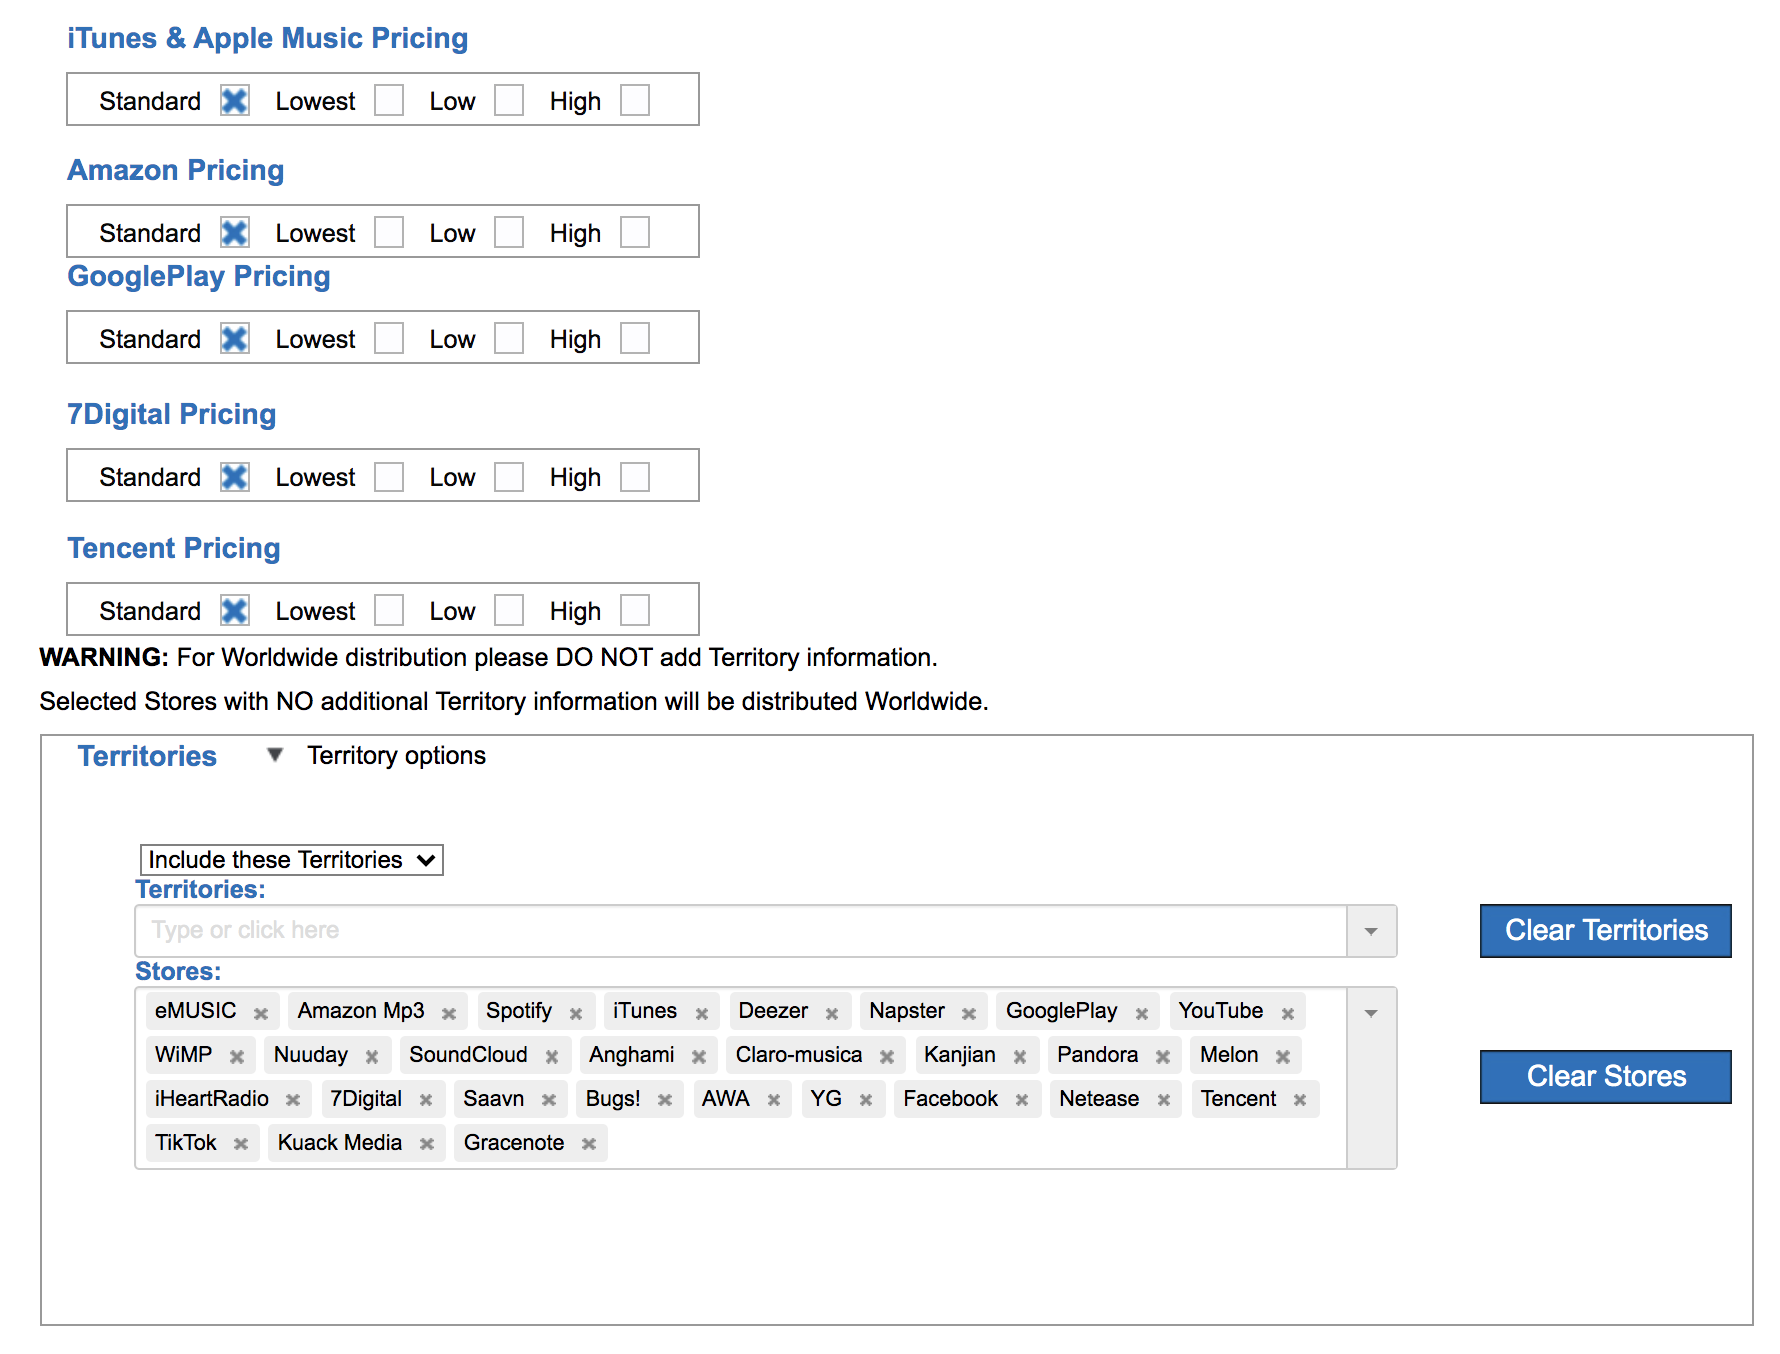
4. Choose Your Stores. This part should be simple. What services do you want your music on? Spotify? YouTube? Tidal? All? You can be picky but often the default is to distribute on all platforms all over the world. RouteNote makes it easy with one button-click.
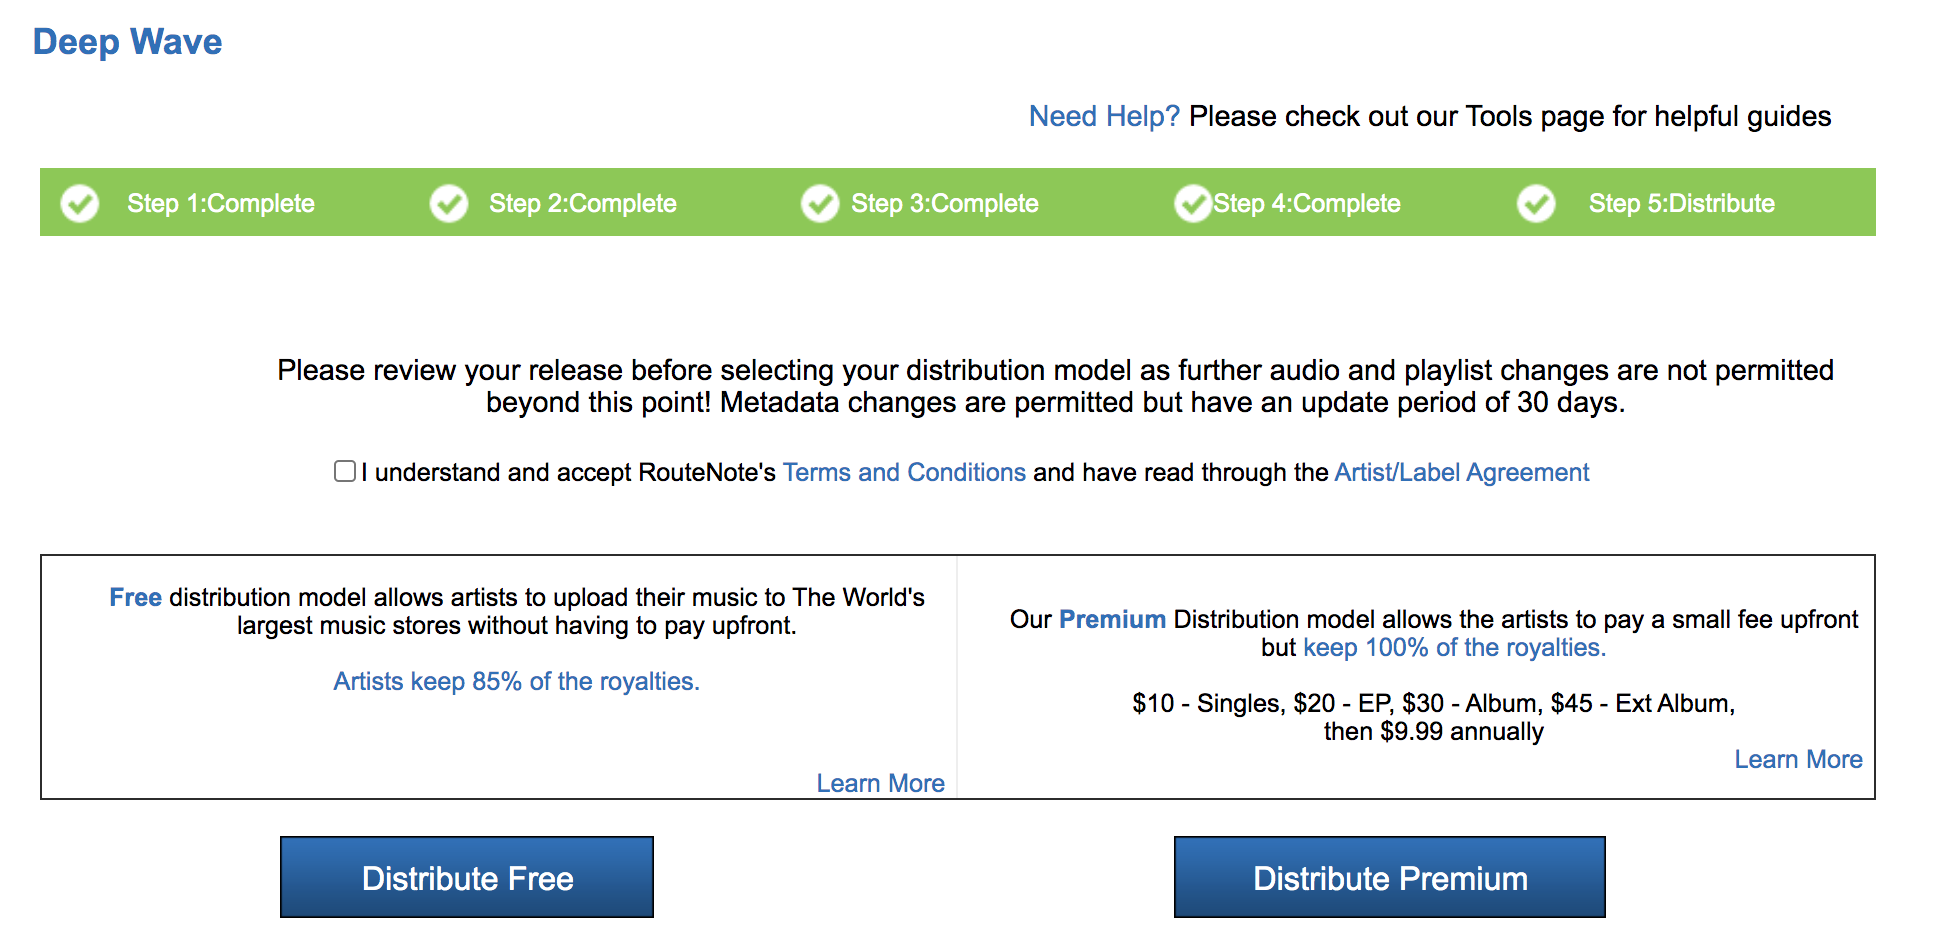
Now you’re ready to distribute! All you need to do is check over your work and then click on “Distribute Free.” And that’s it! RouteNote will take a cut of your streams (15%) but there are no upfront costs to the process.
5. NOW WHAT?
The release will take about a week or so to be released, at which point you should receive an email. If there are issues with your work (track titles too generic, audio file has copyright issues, etc.) you will receive an email in which you’ll need to resolve all issues before the release can move forward (footnote 5).
While you wait for your release to go through moderation, here are a few things you’ll want to consider as part of any release that you do in the future. Maybe not part of this walkthrough, but certainly if you are getting serious about releasing your music.
1. Check out new music. Listen to the walkthrough release, Sounding Human, on Spotify, 🙂
https://open.spotify.com/album/2qUZchgXBIWkz7Di6jdFiY?si=_2LF9vwmTICyeSXMCzATTg
2. Register your work(s) with a Performing Rights Organization (PRO)
If you’re not already part of a PRO (ie., ASCAP, BMI) you should strongly consider it. …. You’ll need to be registered with a PRO in order to register your work for admin publishing royalties among other things. Here’s some reading about PROs (url) (url). Quick note: A composition can have multiple recordings (ISRCs), but only one composition (ISWC). What’s an ISWC? Read here (URL).
3. Register your work on SoundExchange
At this point, your music will appear on streaming platforms that have two types of plays (interactive and non-interactive). Interactive streams are where people hit the play button on your music (or if it’s on a playlist. However, digital distribution services like RouteNote cannot collect on non-interactive streams (radio-type play). SoundExchange (url) is the collector of these royalties. Registration is free, but you’ll need to upload and claim all your recordings if you want to collect within this market. Want to learn more about this? Read here (URL)
4. Claim your Artist Profile
After your release is live, you’ll want to decide if you want to claim your artist profile. Doing so allows you to update profile pic, add a bio, create artist playlists, and even track who is listening to your music every day. Claim your artist on Apple (url), Spotify (url), Amazon (URL).
5. Start a Digital Store
Some services offer you to sell your music directly to fans/consumers, but many are not digital stores. In this case, you may consider a digital store like Bandcamp (url), where you can sell your music as direct downloads, all from one location.
That’s basically it! In one hour or one pot of coffee (hopefully that’s all it took), you’ve gone from zero to release. If you dug this walkthrough, please share, follow my music on Spotify (url), and pay it forward in your own musical community. Thanks for being an active participant!
Footnotes:
1. 30 seconds for a stream count seems to be an agreed-upon time length. I ran a test on my EP Software 1.17 (Spotify link) with the final track clocking in at 26 seconds. After a year and with friends streaming this track across multiple services, the track still has 0 plays for royalties. If you want to dig deeper on Spotify’s algorithm, which helps support the 30-second rule, check out this article (url).
2. Streaming services typically average -12dB to -16dB Integrated LUFS (loudness units to full scale). All streaming services use LUFS to act as your own personal DJ, helping adjust the volume between tracks that may be coming from a different genre, era, or artist. It’s become more common that Spotify uses -14dB LUFS for its target. This means you that if you crush your track with an integrated LUFS (overall average loudness) of -8dB, Spotify can very well turn your track down by -6dB making it half as loud… meaning you lose all that intensity you spent so hard to work for. Use a meter! (url)
3. Make sure you always listen to your work after you export it! You want to make sure everything sounds correct before you upload your audio file. Do NOT distribute without listening to your final work first.
4. RouteNote registration full disclosure. I included a referral link for registering with RouteNote in step 3. Referral ID: 2f79120f. You get your full cut regardless; RouteNote simply takes a percentage of their own earnings and passes it on to me. Thank you for supporting articles like this with using the referral code.
5. Note for our walkthrough that releasing a noise track via RouteNote will not appear on Apple Music / iTunes. I inquired with RouteNote directly, and here’s what their moderation team had to say (email dated 7/24/2020), “Unfortunately iTunes no longer accept white noise/nature sounds content due to the high amount that was being uploaded to them. They have asked us to no longer send it to them, for this reason the store was blocked.” If you go through a different distribution service, you can get noise albums on Apple Music (case in point, here’s an album I created for an Oregon-based birth center: https://music.apple.com/us/album/calming-sounds-for-pregnancy-birth-and-parenting/1522834278)