While teaching Data Sonification at the University of Oregon, we talked a lot about inference preservation, communication of idea, filtering and bias of data, and by extension, tool building as a process for supporting sonic hypotheses. To that end, I wanted to empower students with their own work inside Kyma, so we spent a class walking through the process of Encapsulation.
Encapsulation allows one to take a Sound and “create a simpler, cleaner interface for that Sound by reducing the number of controls and putting them all on the same level. Encapsulating a Sound does not make it more computationally efficient, but it does present a clearer control interface between you and the Sound” (Kyma X Revealed 2004: 293). Or, another computer music way to say it…
Max/MSP::abstraction
Kyma::encapsulation
For those familiar with NeverEngine Labs, one can understand the power of encapsulation to create some really great Sounds that serve compositional, sonic, aesthetic, and educational goals. Encapsulated Sounds can help one save time, grow as a practitioner, and engage with the growing Kyma community. Tool building and sharing also invites positive activities like research, collaboration, and publication. The Kyma X Revealed section on Encapsulation (pp. 293-303) is a great starter, but can be a difficult first reference for the uninitiated. This article seeks to provide a current walkthrough of encapsulation that supplements existing documentation.
What will you need? Head over to the Kyma Community Library (https://kyma.symbolicsound.com/library/encapsulation-walkthrough/) to grab walkthrough files, but beyond this article, you will find Kyma X Revealed (293-303), any software to create a .png icon (e.g. Adobe Illustrator, Photoshop), and your design thinking hat helpful.
The process to Encapsulation follows five basic steps.
1. Create a Sound(s) to encapsulate
2. Define your controls and change the values (numbers or !EventVariables) to ?vars
3. Create a new class (Action > “New class from example”)
4. Add default values to the controls to open up Class Editor
5. Add descriptions and icon, set parameter types, and close to Save Class.
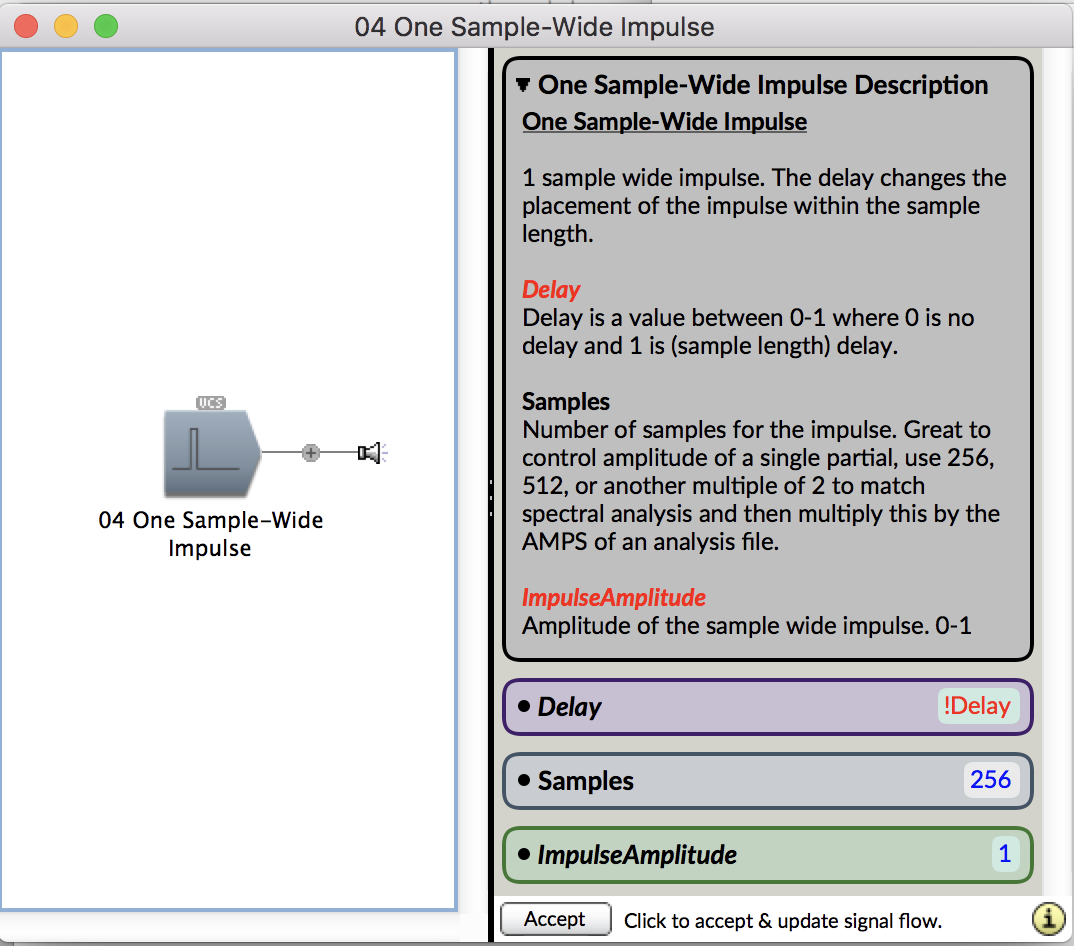
Step 1. I created a simple Sound to encapsulate (Figure 1).
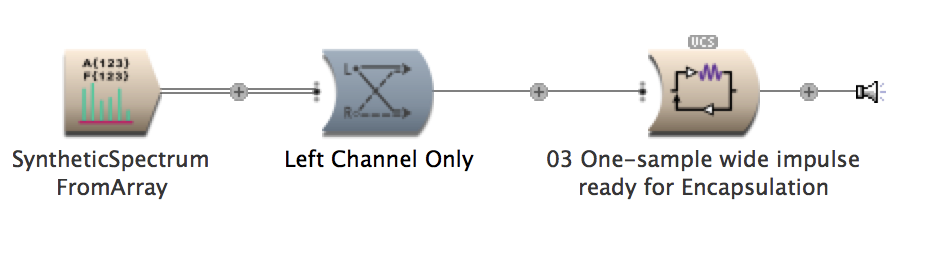
The Kyma Sound to encapsulate, a one-sample wide impulse of N-samples long, is meant for controlling the amplitude of a single band in a spectral analysis of the same sample length (e.g. 256 samples). Bearing this user case in mind, where the encapsulated Sound will effect a spectral analysis’ amplitudes, Figures 2 and 3 depict the parameters fields of the two Sounds that create the effect (SyntheticSpectrumFromArray and DelayWithFeedback, respectively).


Step 2. I labelled the most helpful controls for the encapsulation process as green ?variables (Figure 2 and 3). Green ?variables are what enable a user to access parameter fields after encapsulation. The three user parameters, ?ImpulseAmplitude, ?samples, and ?Delay provide the user with the ability to control the amplitude of any single partial in a spectral analysis of n-window size. SyntheticSpectrumFromArray (Figure 2) creates a n-sample long spectrum with only one envelope. Since Kyma handles spectrums in the time domain as Amplitudes in the Left channel and Frequencies in the Right Channel, we treat the Partials parameter field more like the Sample length of the analysis. A single envelope is generated with the Envelope parameter field set to 1, there will only be one partial to control, with all other envelope amplitudes set to 0. That single envelope’s gain is controlled by ?ImpulseAmplitude. The Left Channel is selected, which means the SyntheticSpectrum Sound will only impact the spectrum partial’s amplitude, not its frequency. [See Gustav Scholda’s in-depth video for how spectral analysis works in Kyma and how to spectrally manipulate frequency and amplitude.]
?samples is meant to match the length of the spectral analysis it will later control. The delay length is also set to the same length, as DelayWithFeedback enables the single envelope to “scrub” across the sample length. In essence, ?Delay enables a user to select which partial’s amplitude they will effect.
Footnote: An esoteric note about this particular Sound. The Amplitudes parameter field of SyntheticSpectrumFromArray expects an array. Because the variable ?ImpulseAmplitude is a green ?variable, Kyma will prompt and ask the user if the ?variable is an “Element” or an “Array.” Because the Sound is meant to control a single partial, the ?variable is an “Element,” not an “Array.”
Step 3. Time for Encapsulation. From the main menu, select Action > New class from example (Figure 4).

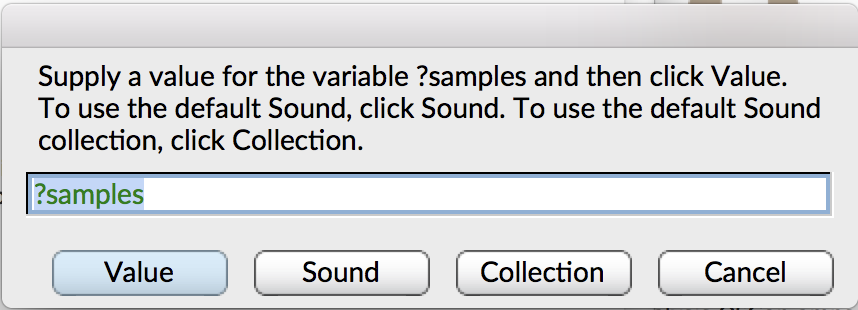
Step 4. The menu selection will then generate a user prompt to add default values to the three green ?variables (Figure 5). All variables are “Values” and whatever is entered will generate defaults values one may alter later. For now, one may enter 1 for ?ImpulseAmplitude, 256 for ?samples, and 0 for ?Delay.
Step 5. The real encapsulation work begins adding Class name, descriptions, icon, and Input/Output type for formatting look and feel. Figures 6 and 7 depict the encapsulation editing process before and after.
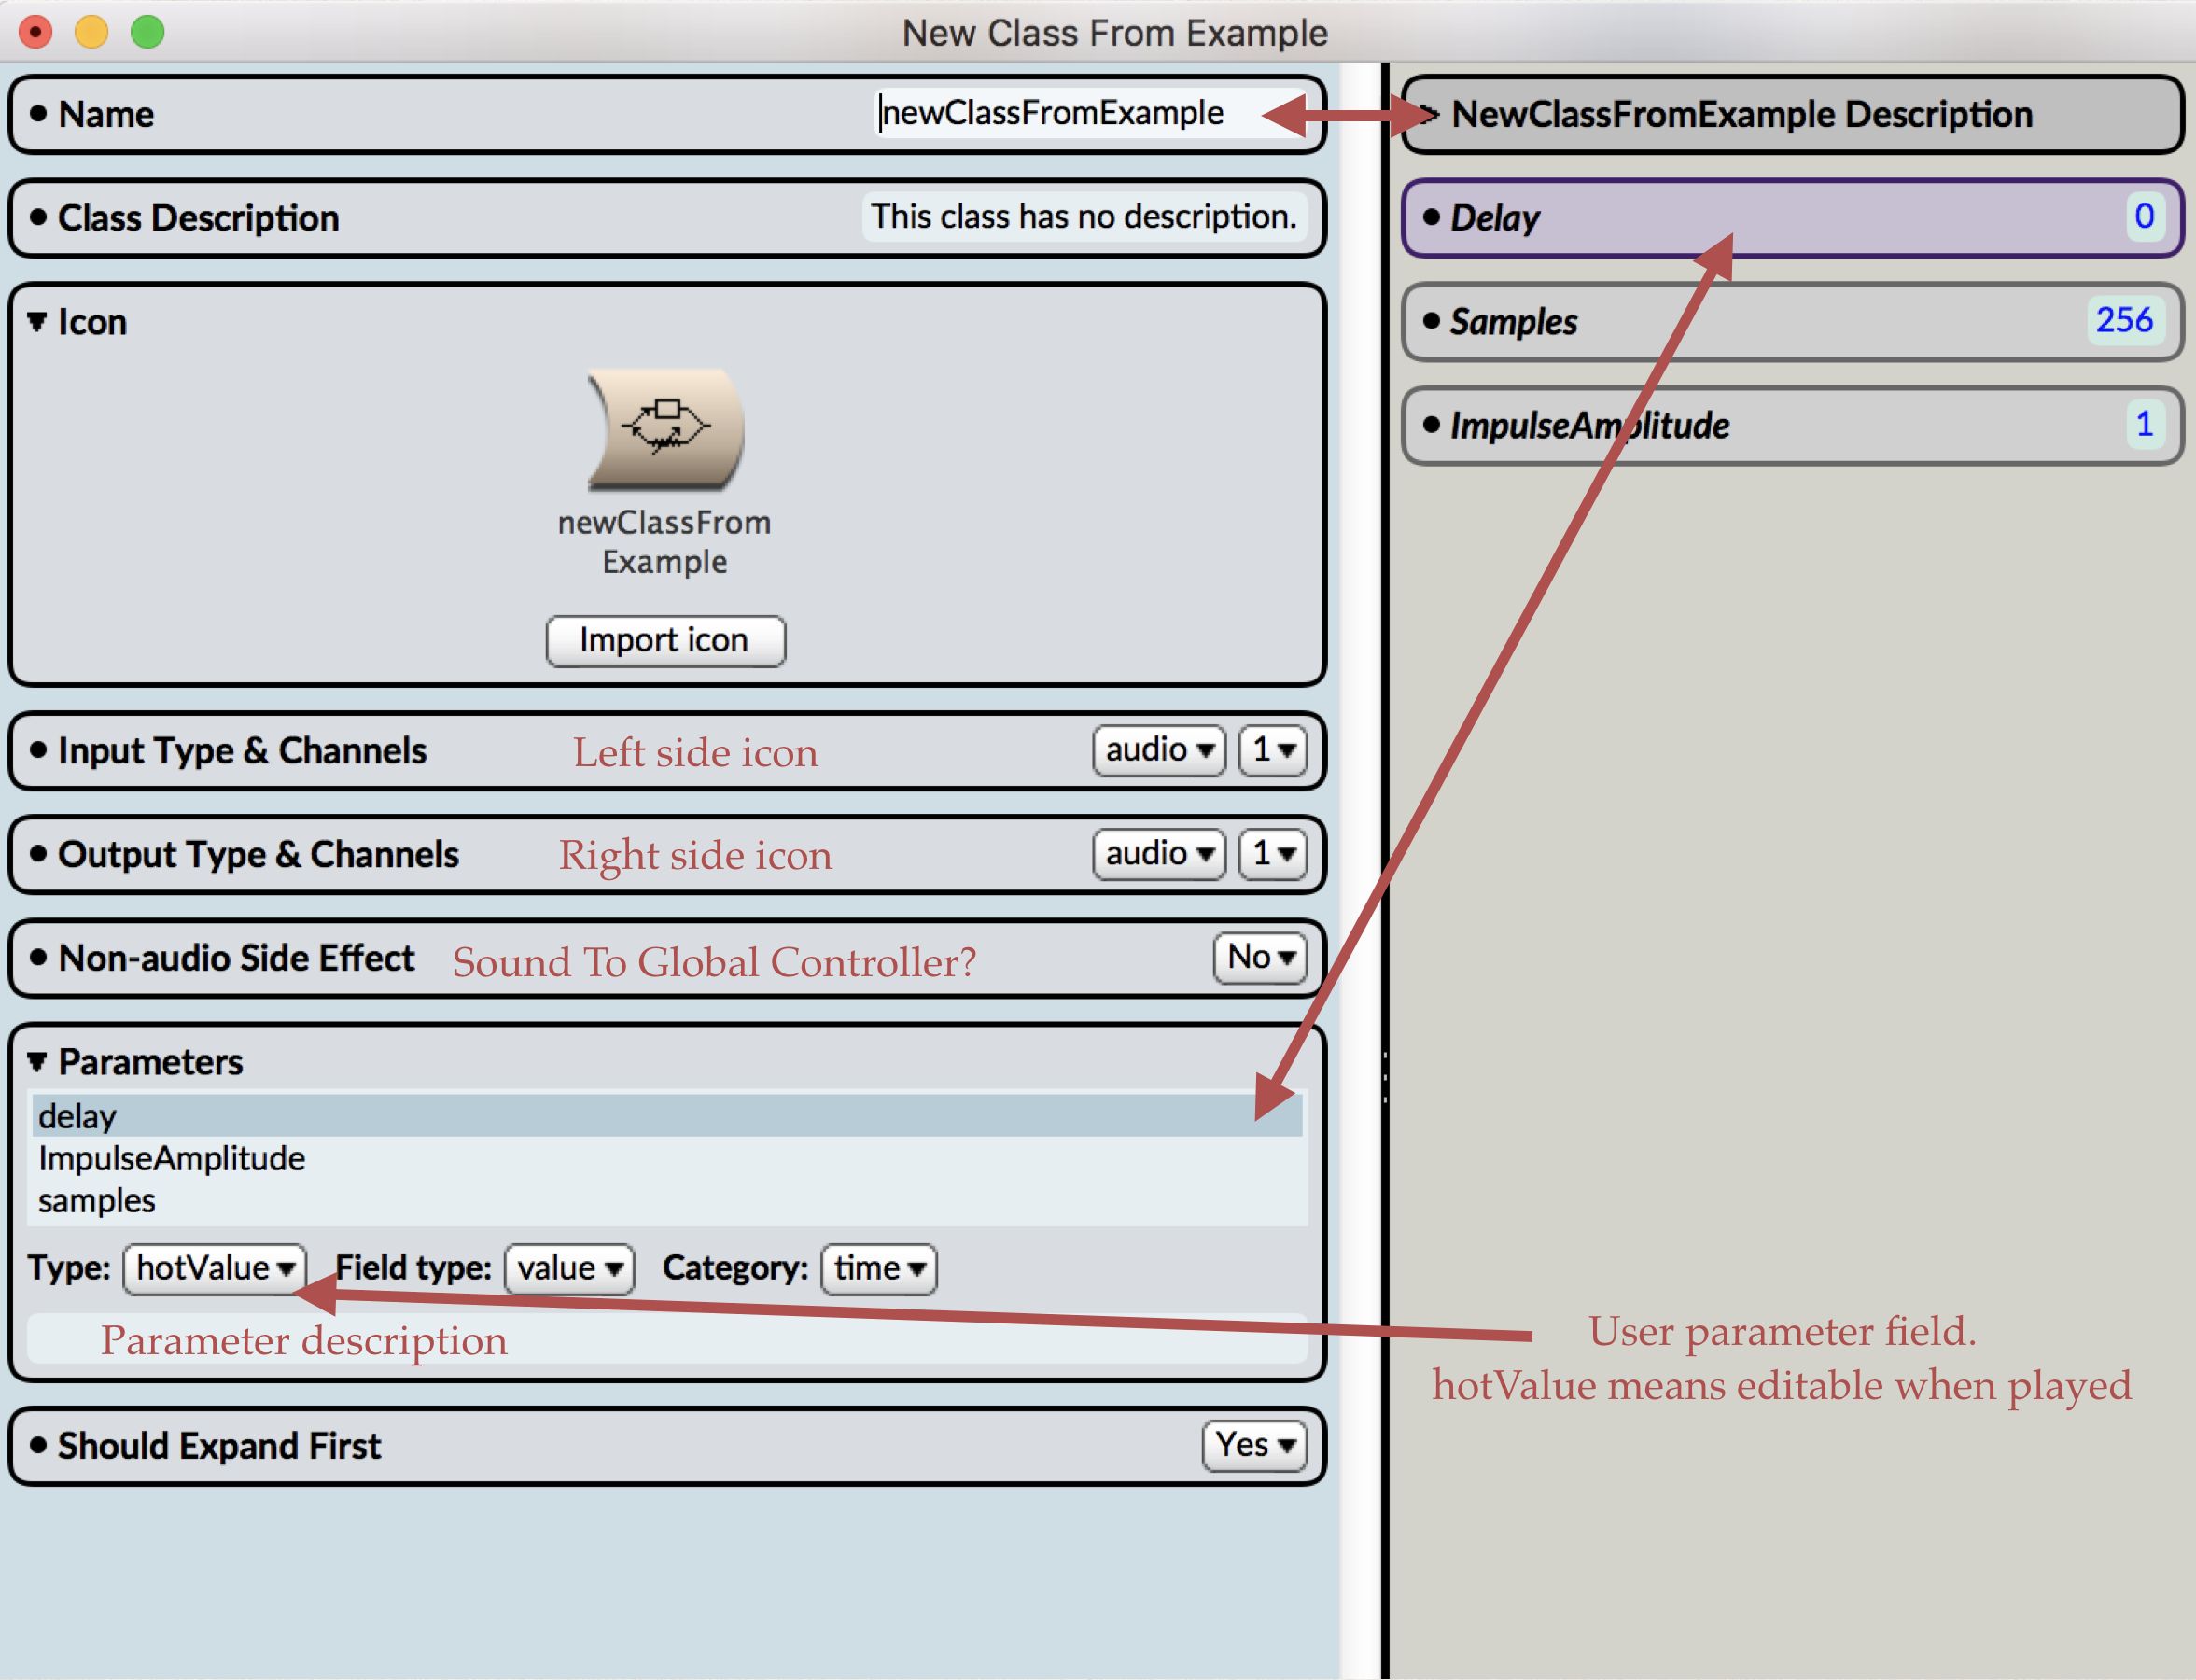
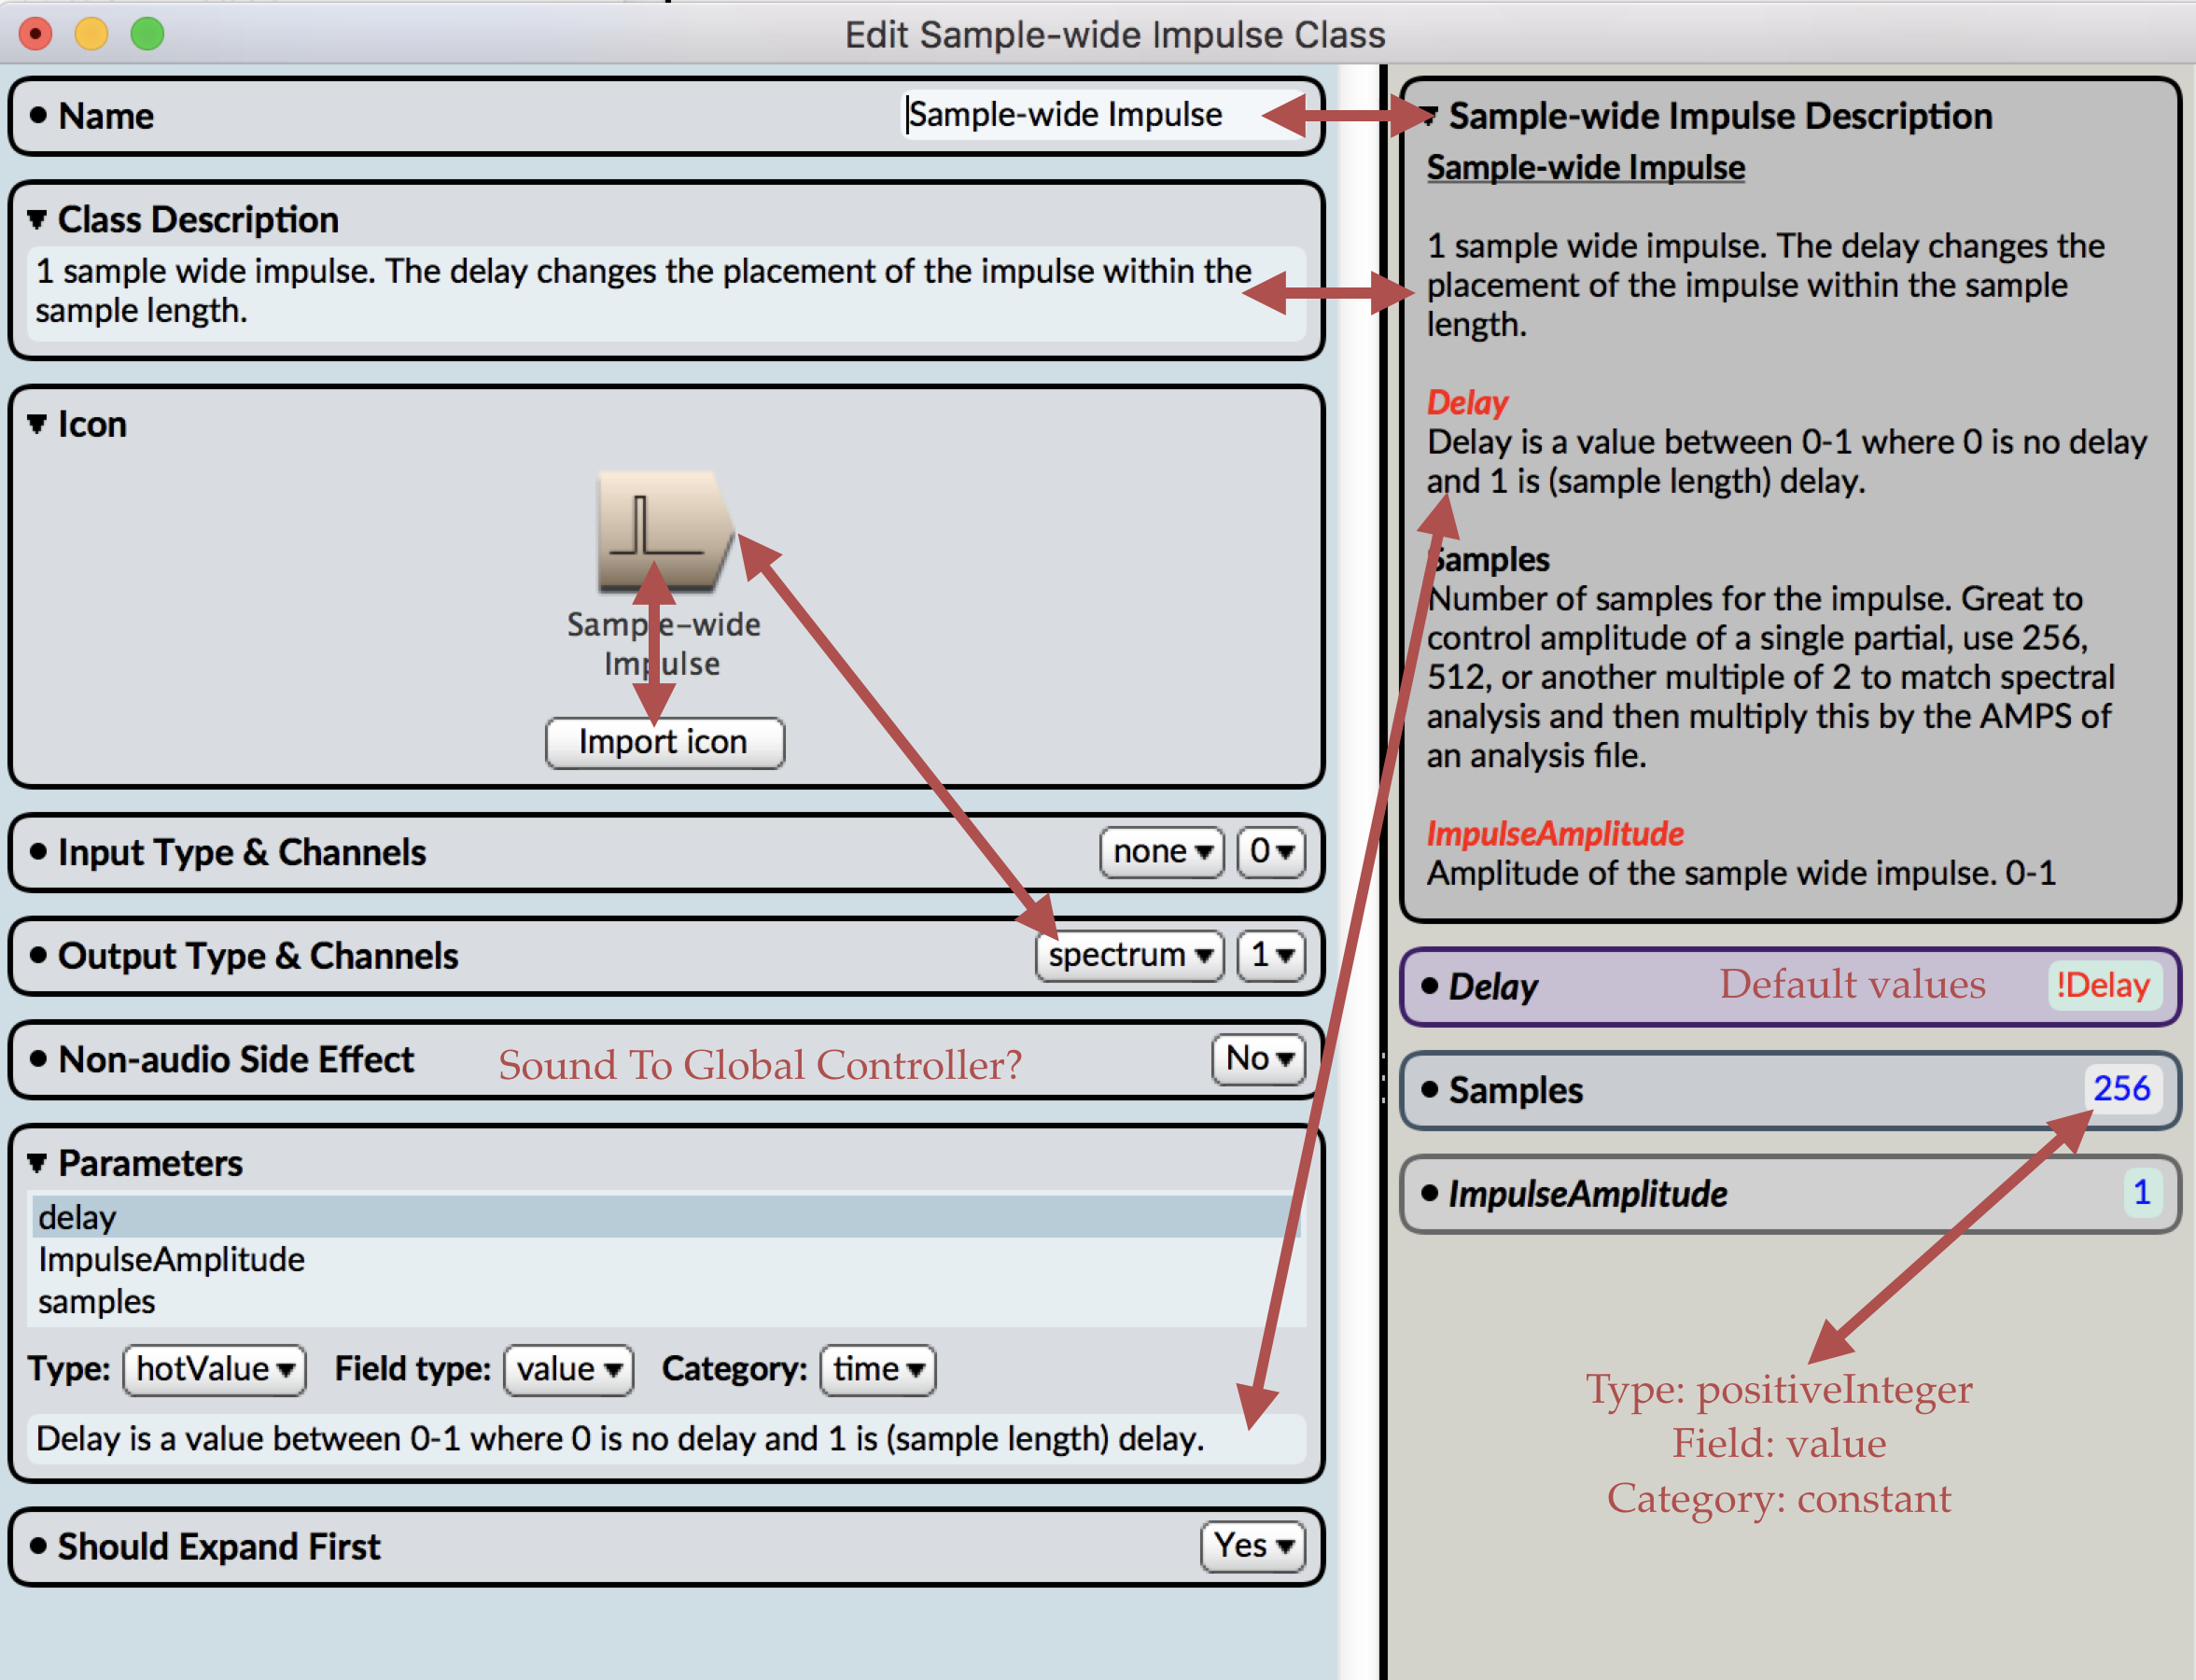
The various fields altered for the encapsulation are as follow. Name is the name of the class, which can be searched for. Class description is the overall description, which can include overall sonic description, use cases, and user specific comments.
Parameters are designated before creating a new class. Each ?var ends up as a parameter field. For example, ?samples becomes the parameter field “Samples.” Naming a ?var sets the Class parameter field name. The parameter field in the Class editor contains our default value from the previous step, but can be changed in the editor. In addition, the Parameter options in the left tab will enable one to set Type, Field Type, and Category of the Parameter altering how the parameter field behaves and looks. Figure 7 depicts two of three parameter fields and these options.
Close the Editor window to save the class. You may always edit the class by choosing the “Edit class” option from the Action menu (Action > Edit class). Figure 8 shows the completed encapsulated sound.
Example
Figure 9 depicts our new One Sample-Wide Impulse Class played through a 256 sample-wide oscilloscope. Since the delay is set to 0.5, we see our single sample residing in the middle of the oscilloscope (128th sample). Because the single sample may be moved in time (Delay parameter) and has control of gain (ImpulseAmplitude parameter), the Class may be used as a partial picker in Spectral Analysis.
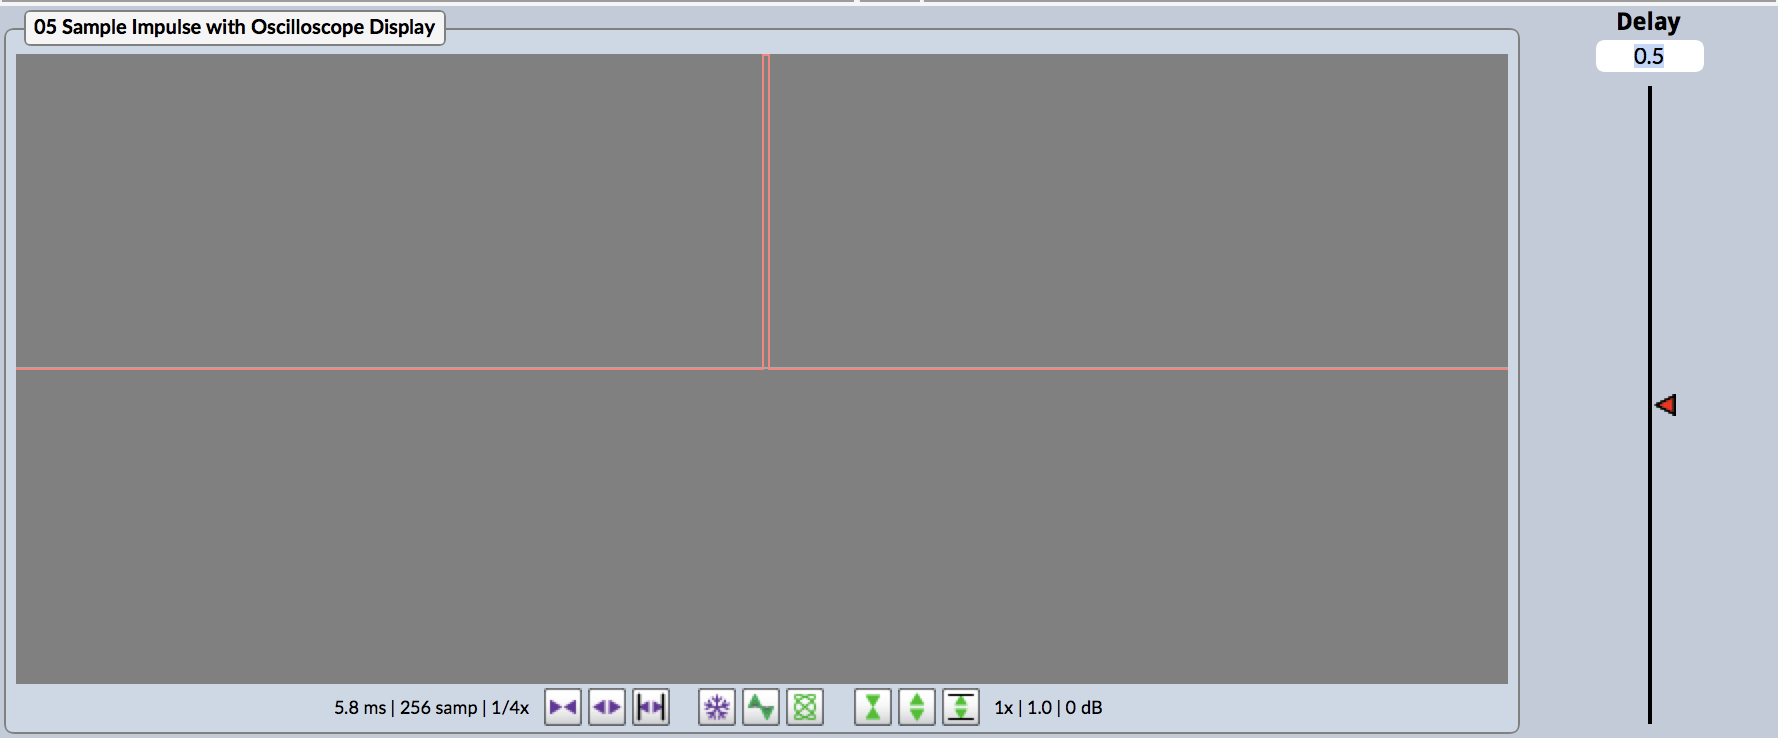
Figure 10 depicts spectral analysis in Kyma, where amplitude and frequencies are divided between left and right channels. The first partial is displayed as the first sample, second partial as second sample, etc. Understanding this concept, we may use One Sample-Wide Impulse to control (read multiply) amplitudes of the left channel in a spectral analysis.

Figure 11 shows how an encapsulated Sound is used to multiply against amplitudes of a Spectral Analysis.
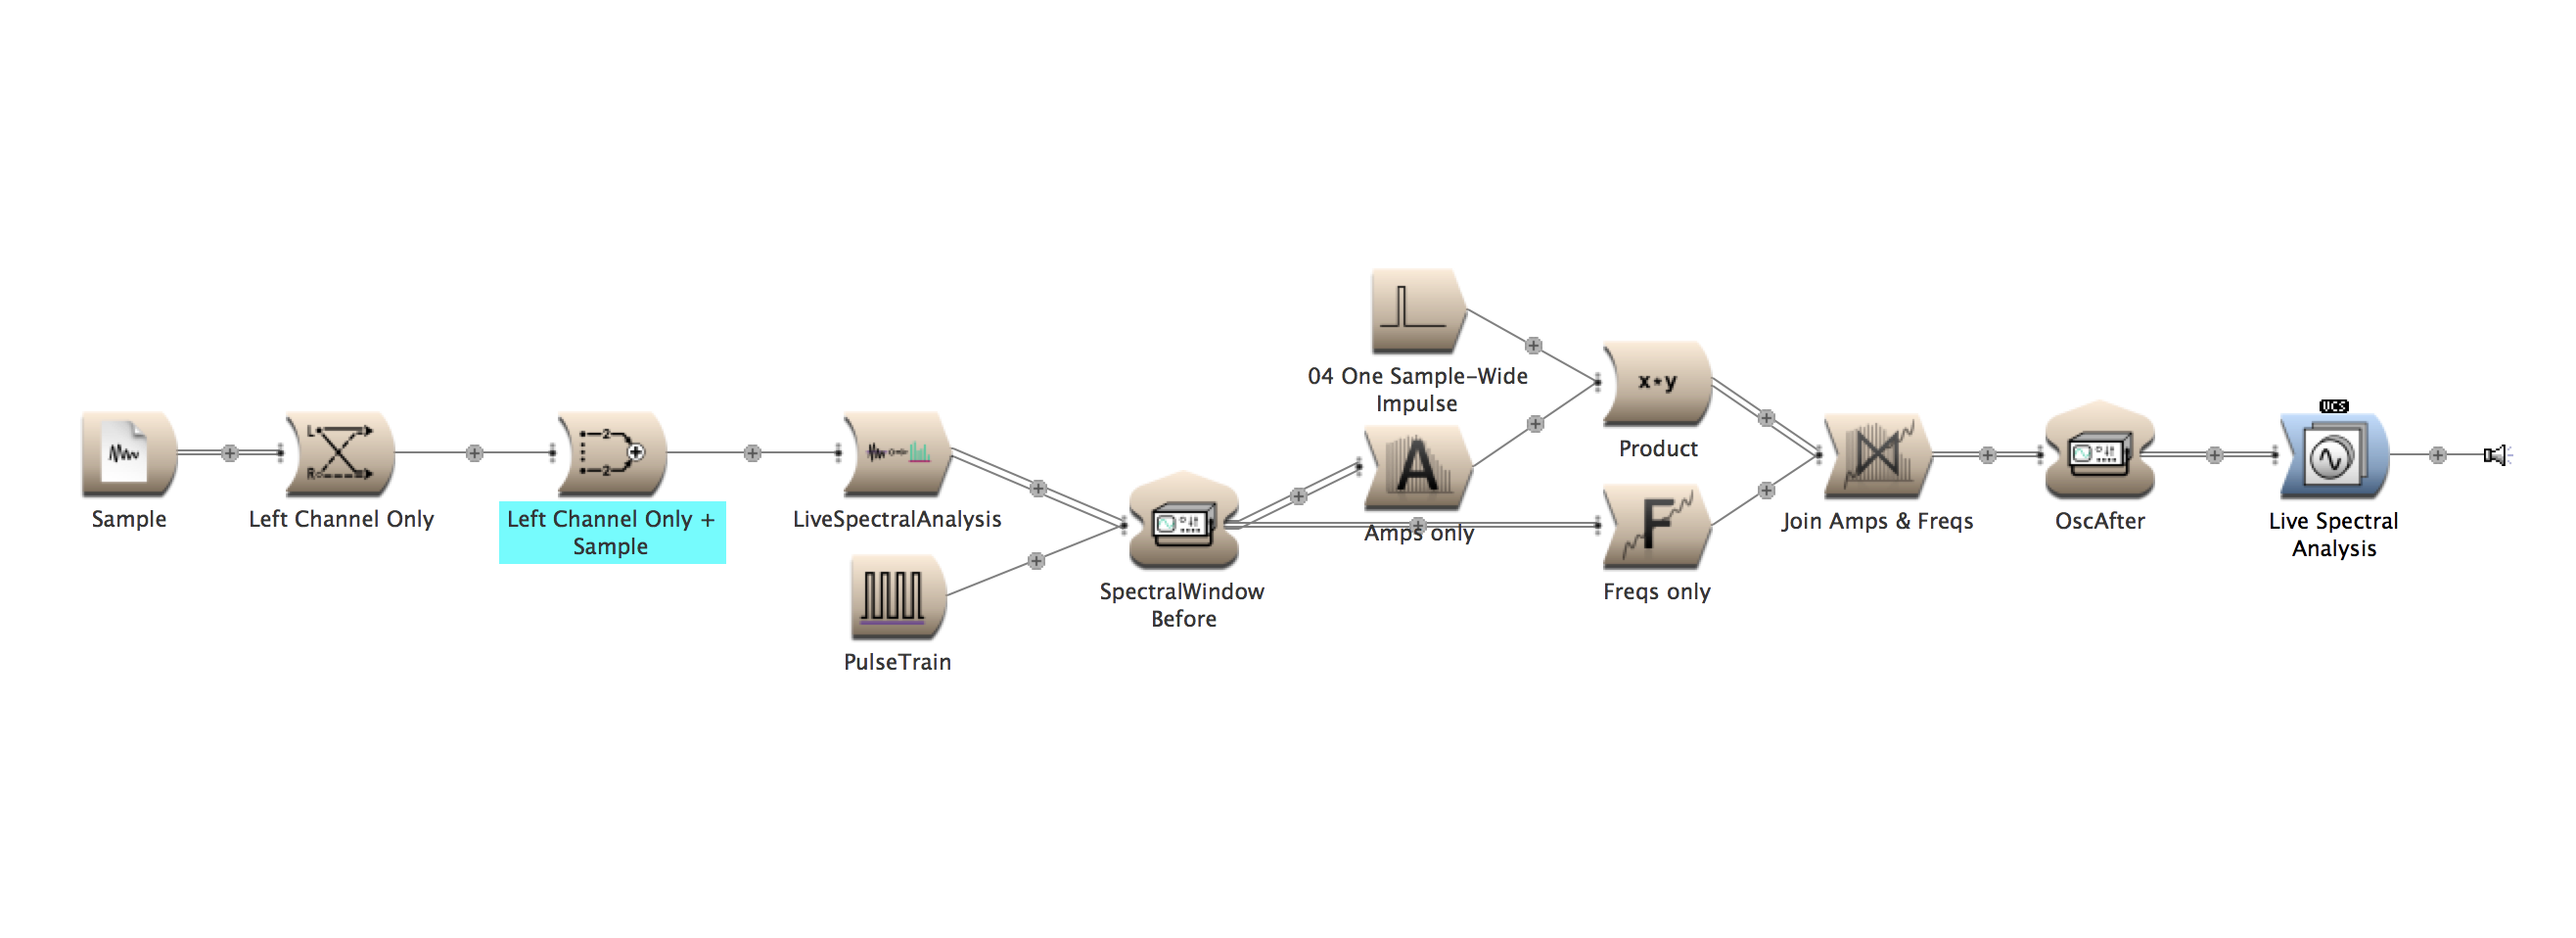
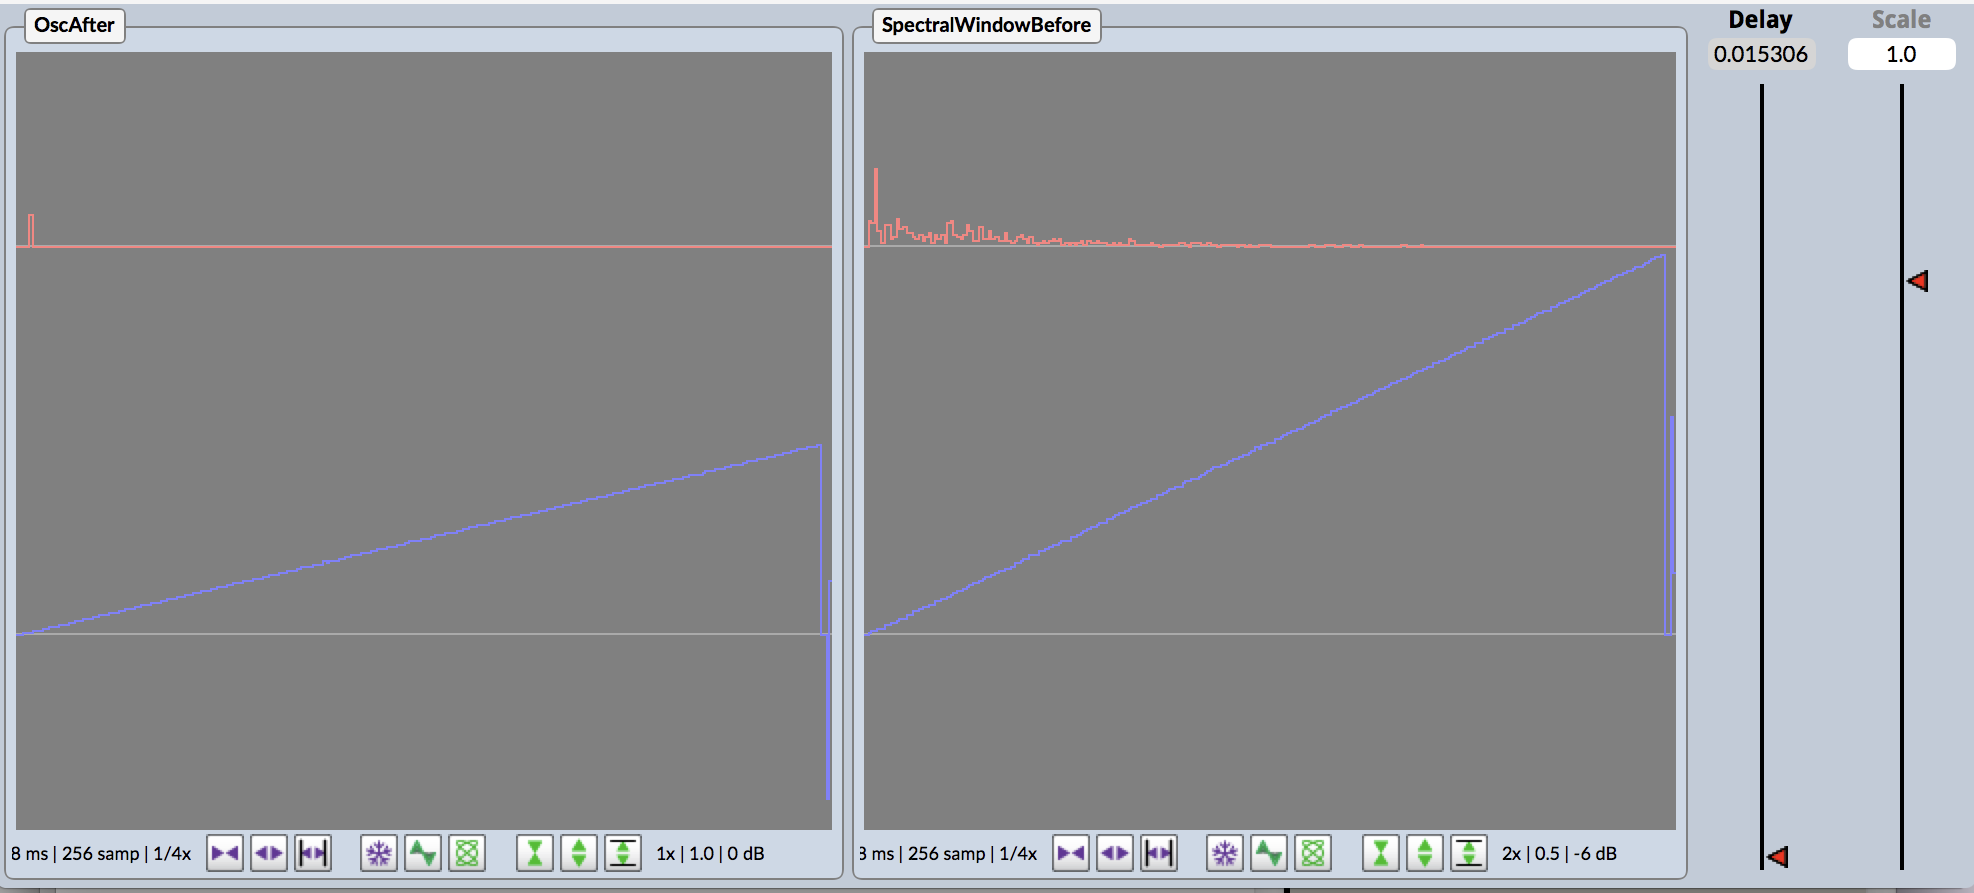
Figure 12 shows oscilloscope view of partials, with single sample wide (one partial) amplitude control. Delay is set relative (0-1) to the 256 partials in the analysis.
Two audio examples using Beck “Dreams” to depict the One Sample-Wide Impulse Class in use as a partial picker.
Audio 1. Beck “Dreams” running through live spectral analysis using a 256 sample window. No partial picking.
Audio 2. Beck “Dreams” with the One Sample-Wide Impulse class controlling playback of a single partial of the 256 sample live spectral analysis. Audio sweeps from a singular low partial to high partial selection and then back down again.
Sitting in KISS 2019 – this is totally awesome!